
Node.js hosting
Cheap Node.js Hosting for Less Than $3/Month with Database and Redis
Run Express, Fastify, NestJS, or Next.js with managed Node.js runtimes, databases, Redis, SSL, Git, SSH, backups, email, and cron jobs without a VPS.
Published 2026-07-30 · 11 min read
Node.js hosting does not have to mean renting a VPS and maintaining every process yourself. HostRight gives you a managed Node.js application workflow inside HostRight Control Panel. Choose a supported runtime, point it at your domain, upload your code, install dependencies, and control the application from the panel.
That is a useful middle ground for Express APIs, dashboards, webhooks, small SaaS applications, Fastify services, NestJS backends, and compatible Next.js or Nuxt deployments. You retain SSH, Git and file-transfer access while the panel handles the application registration and public domain mapping.
The short version
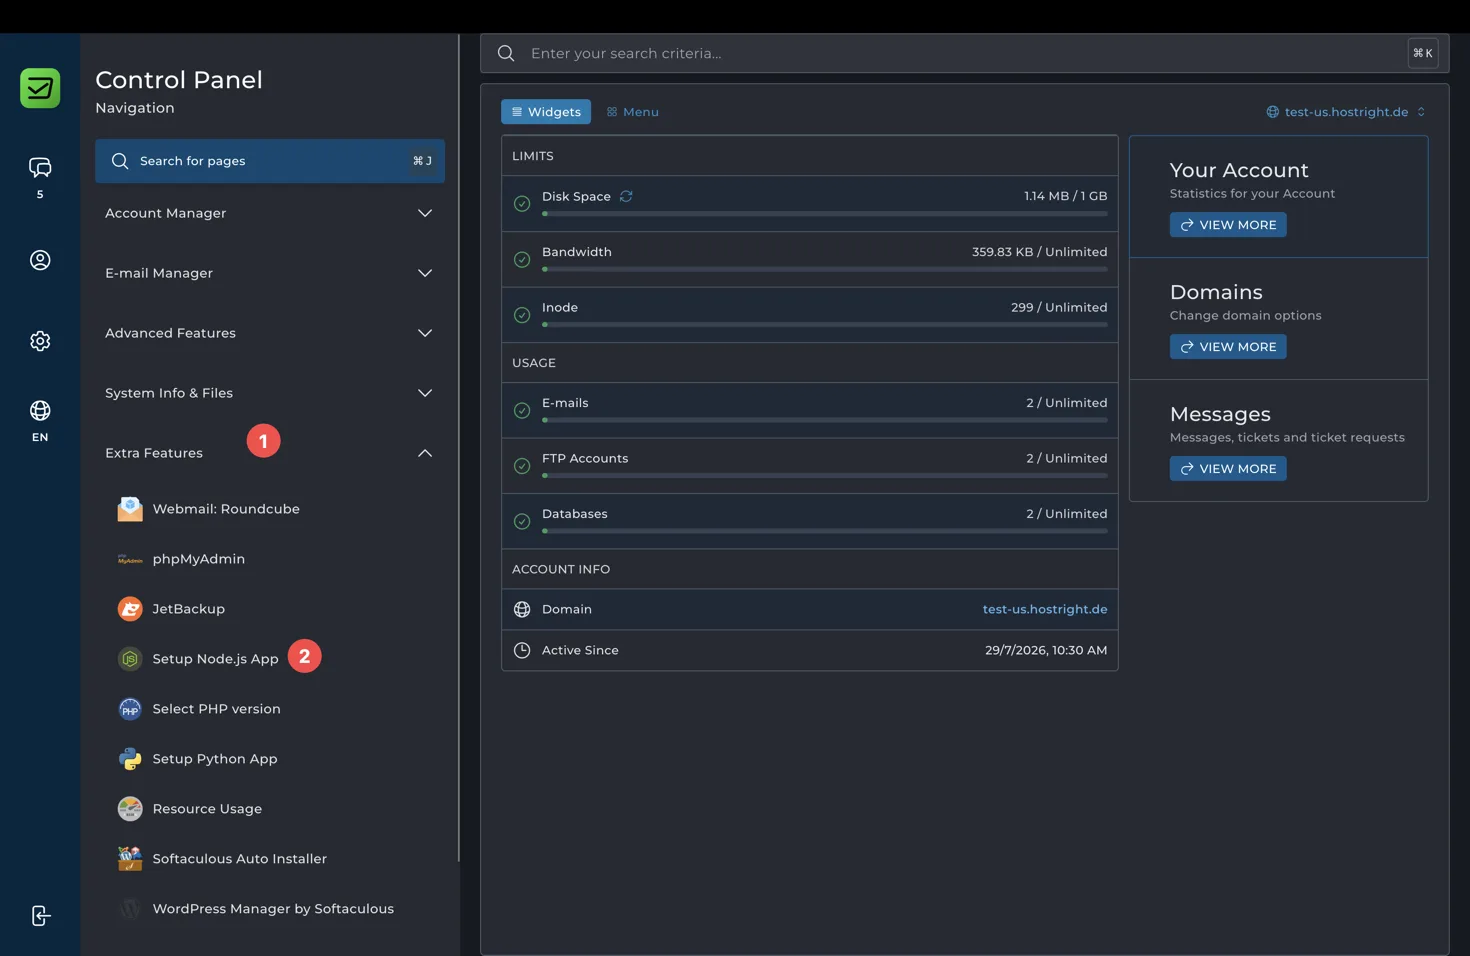
Choose a HostRight hosting plan, connect your domain, open Extra Features > Setup Node.js App, and select Create Application. Use Production mode, choose the supported Node.js version that matches your project, set a private application root such as apps/myapp, map the domain, and enter the startup file such as app.js.
Then install dependencies, add environment variables, restart the application, and test the domain over HTTPS.
What you get
HostRight's plans are designed for practical shared hosting workloads. The exact limits depend on the plan, so review the current order page before purchase. The platform combines:
- Managed Node.js application creation and runtime selection
- Up to 1 CPU core and 2 GB RAM per shared hosting account
- NVMe-backed storage, with storage capacity based on the selected plan
- SSL and domain management
- Databases and Redis
- Daily backups on eligible plans
- SSH, Git, SFTP and FTP access
- Cron jobs and other hosting tools
- A control-panel restart and status workflow
The CPU and memory figures are shared-account capacity, not a dedicated server guarantee. They are well suited to small and medium applications that are optimized, cached and kept within their plan limits.
Why this is different from headline hosting prices
When comparing providers, compare the amount actually charged and the billing interval. Hostinger, for example, displays a low introductory monthly equivalent when its longest term is selected, while its true one-month plan is much higher. WordPress.com also separates its monthly and annual pricing and may package a different set of managed features.
HostRight's useful distinction is that monthly billing remains available while longer terms can reduce the effective monthly price. This lets you start month to month and move to an annual, two-year or three-year term when the application is proven. Check the current checkout page for the exact amount, renewal price, taxes and included resources.
The comparison is not only about price. Some providers put important features behind higher tiers, constrain file or database performance with undisclosed or hard-to-compare limits, or make the best price available only after a large upfront payment. HostRight's advantage is a direct control-panel workflow, conventional file access and application management without requiring a VPS for every small Node.js project.
Create the account and select a location
Open the HostRight order page, choose a plan based on the number of sites and storage you need, create your account, and select a data-center location close to your main visitors. Enter the domain, review the term and renewal price, and complete checkout.
Registration is the short part. The useful part of the service begins after the account is active, when you can deploy and manage the application from HostRight Control Panel.
Create a Node.js application
1. Open the application tool
Sign in to the Control Panel, expand Extra Features, and select Setup Node.js App. A new account may show no applications yet.
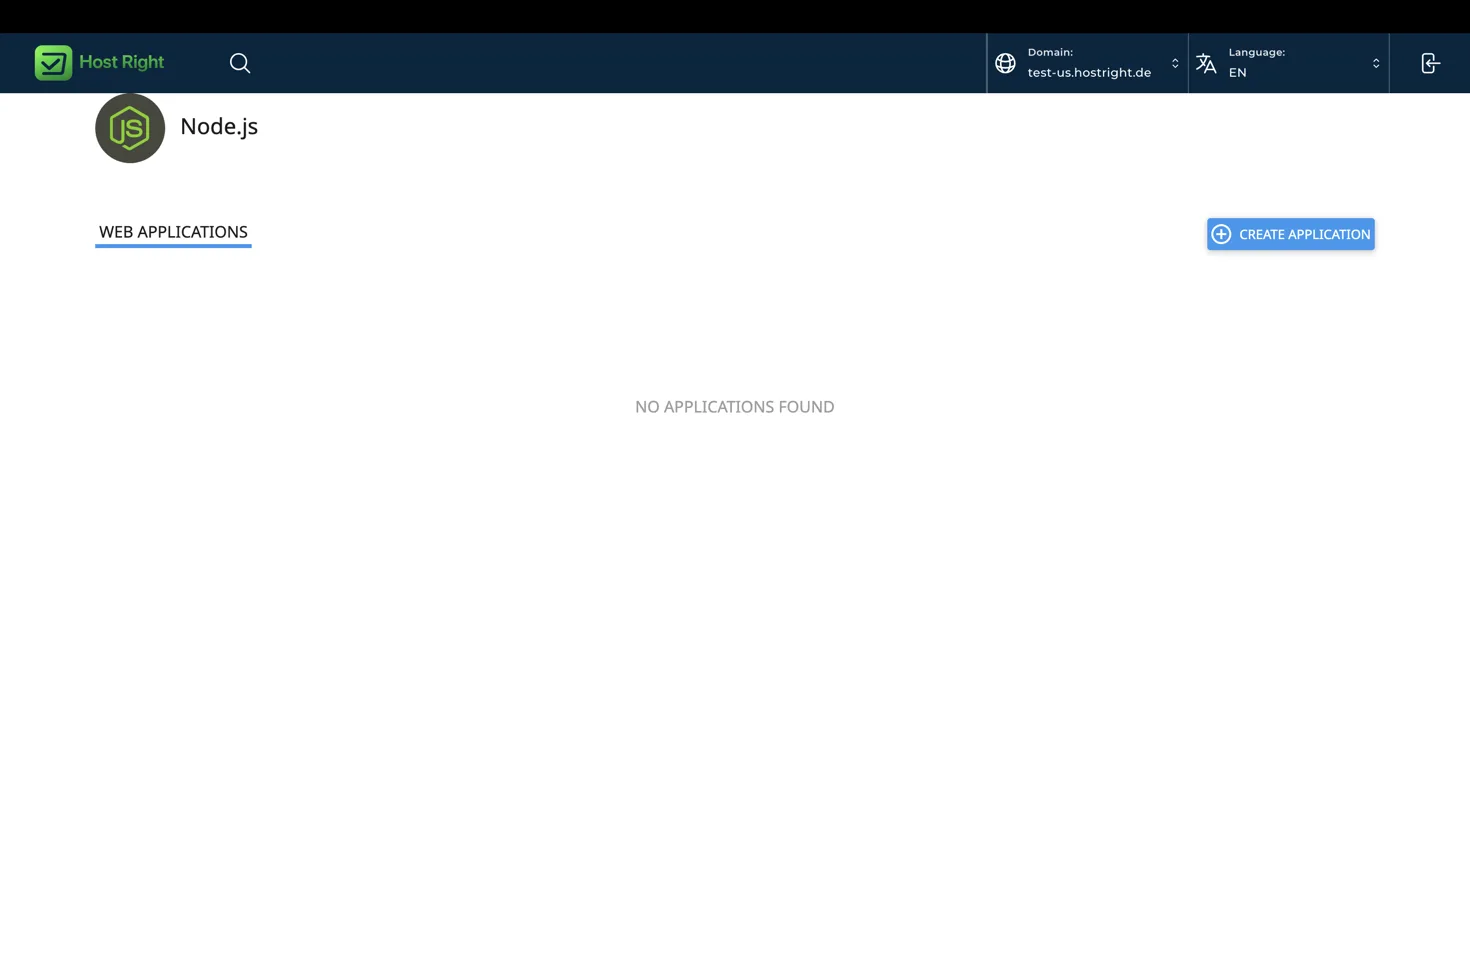
Select Create Application.
2. Select the runtime
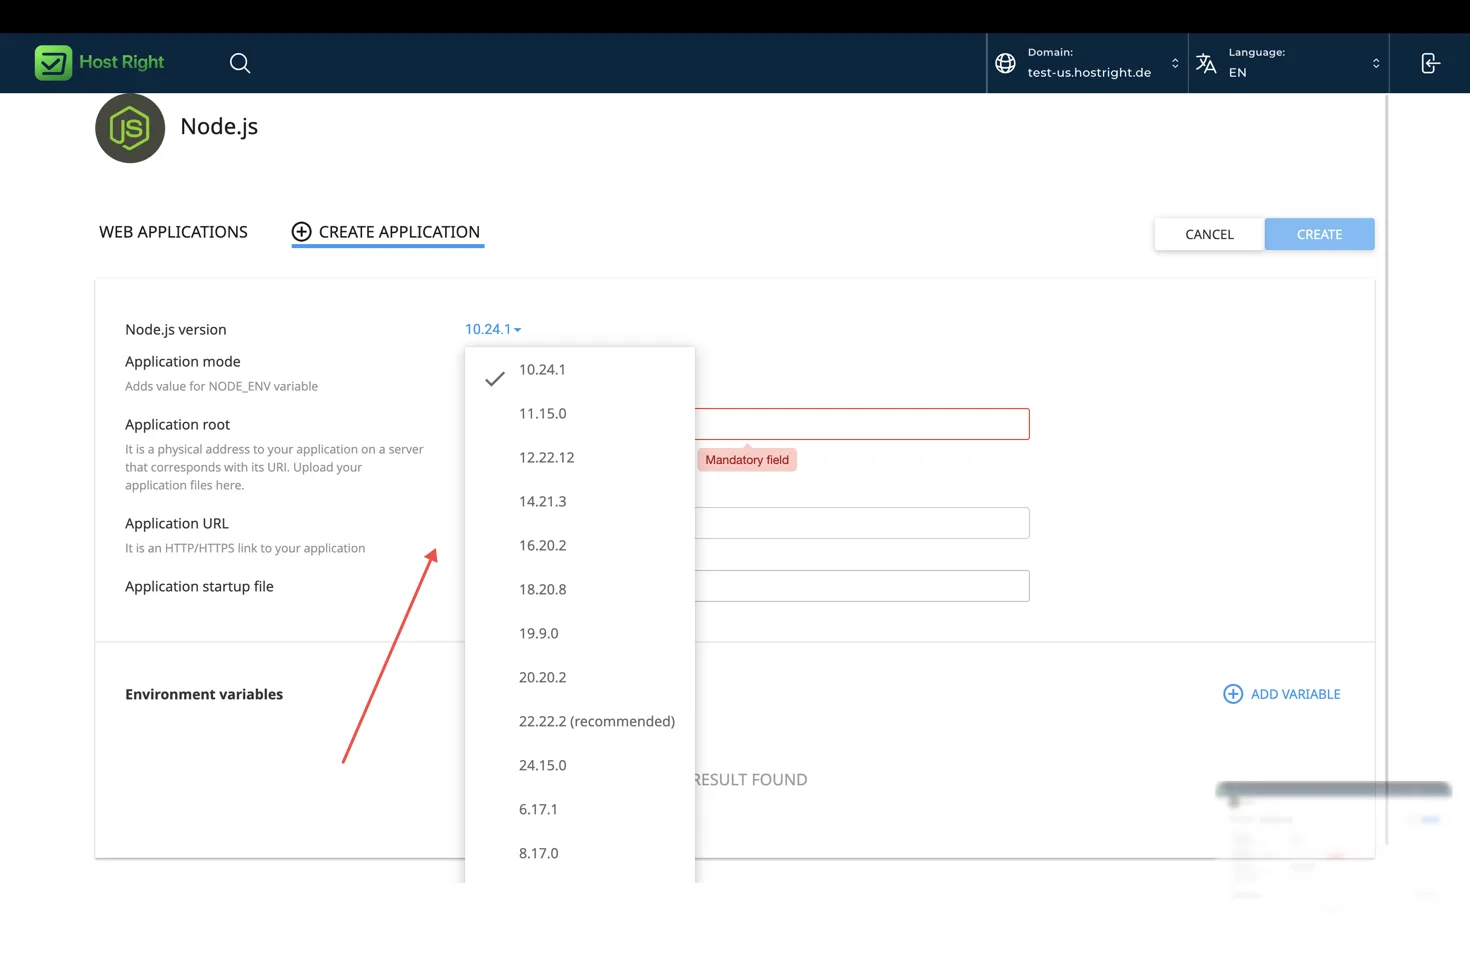
Choose a supported Node.js version that your dependencies have tested. The panel marks a recommended version. Do not upgrade a production application merely because a newer runtime appears in the list. Test the application first, then schedule the upgrade.
3. Select production mode
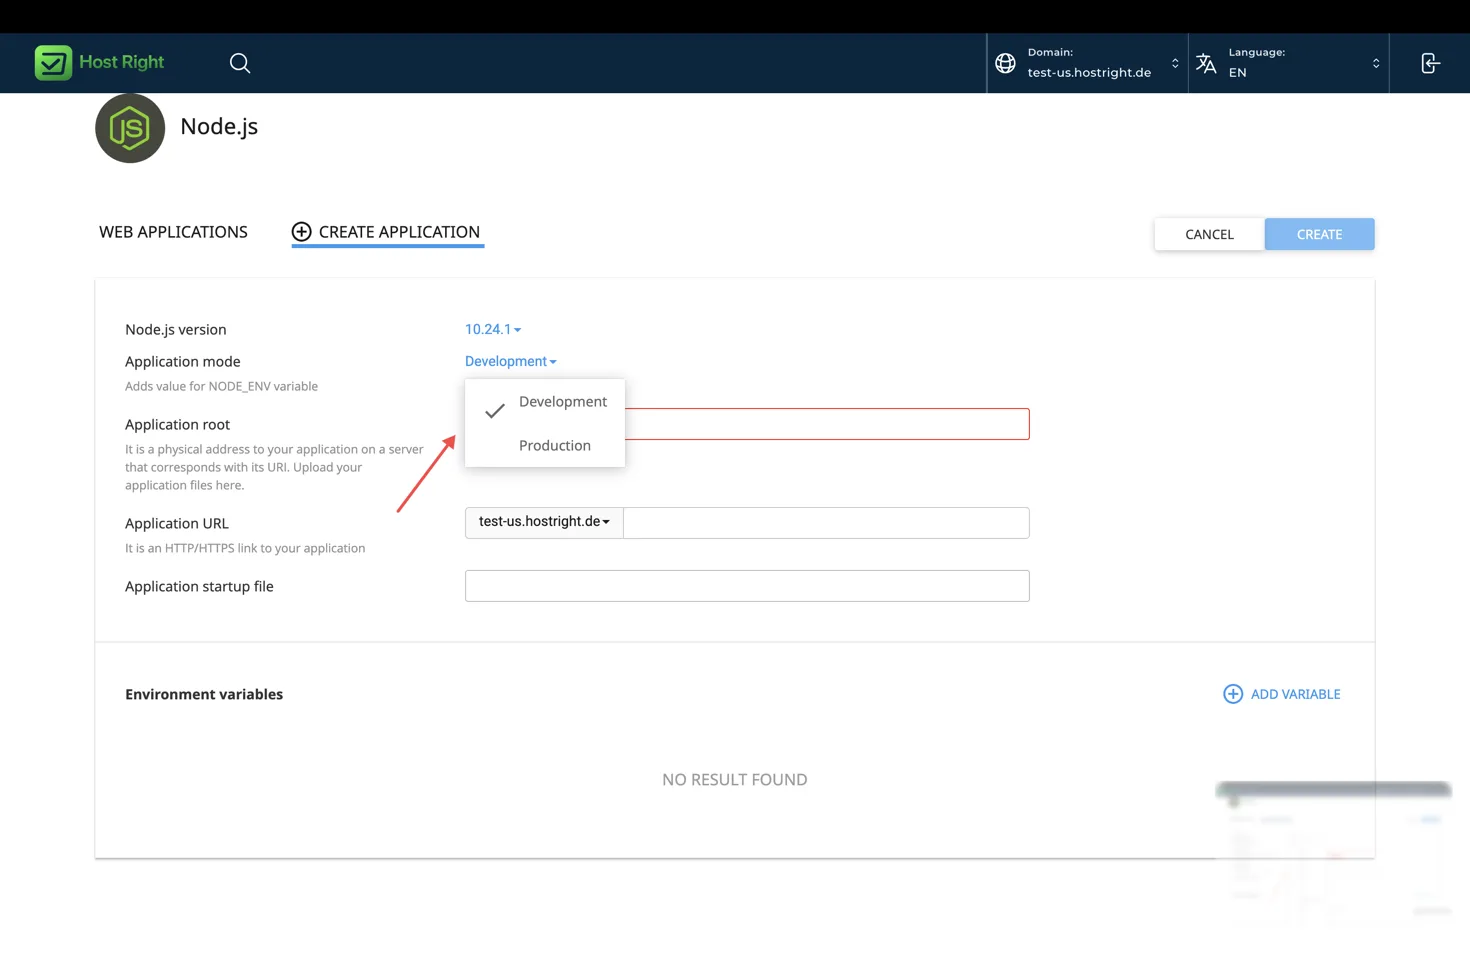
Choose Production for the live site. Development mode is useful for experimentation, but production mode is the correct default for a public application.
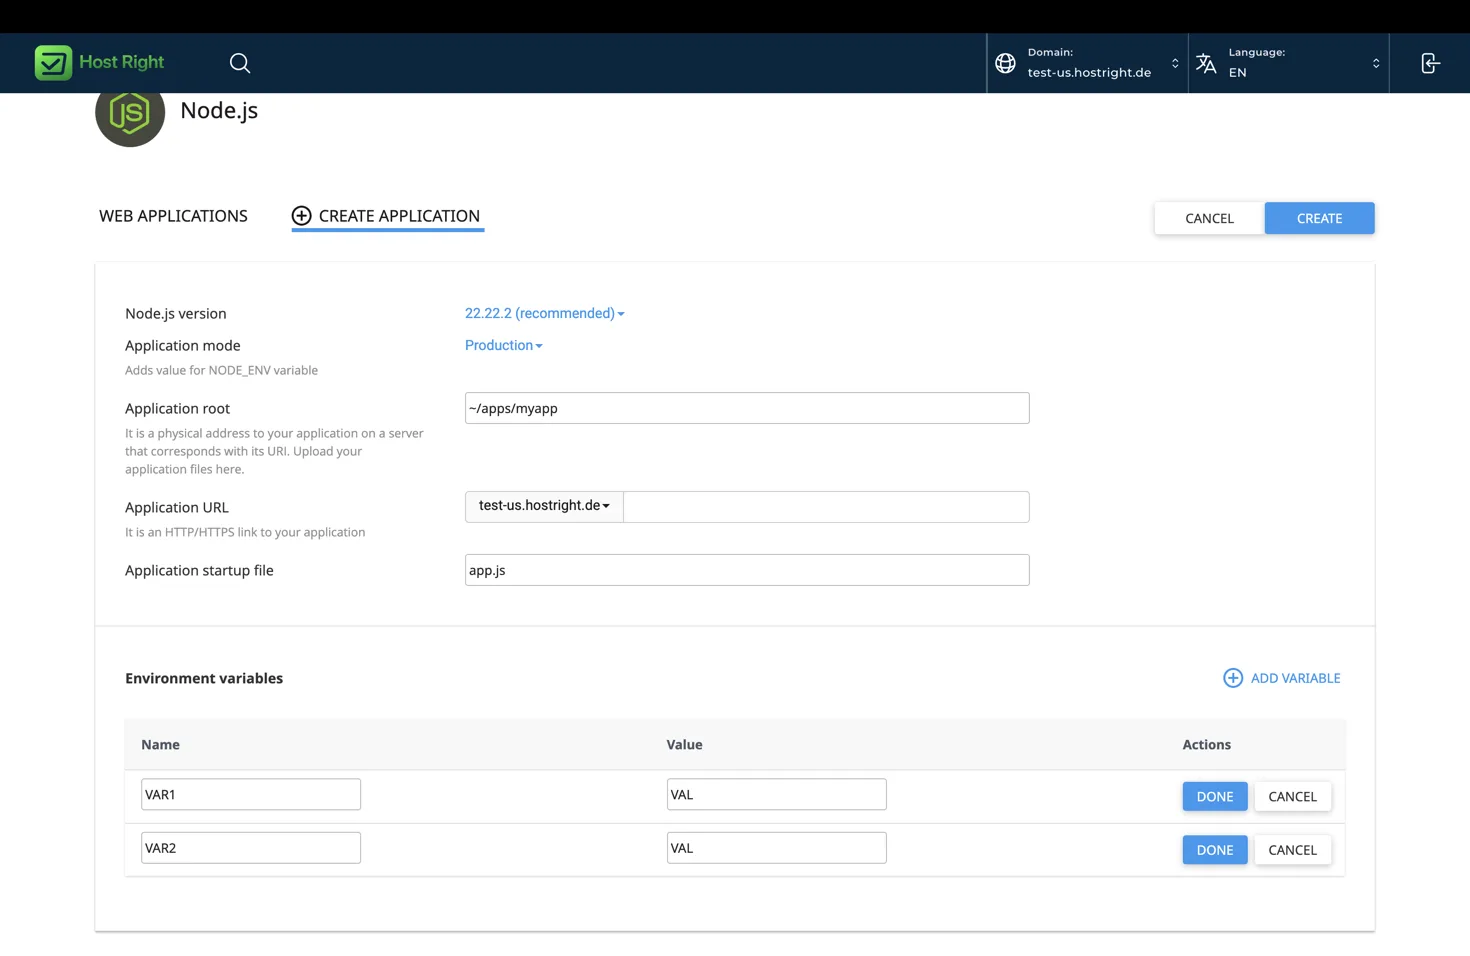
4. Set the application fields
Use a private root outside the domain's public directory. A typical setup is:
| Field | Example |
|---|---|
| Node.js version | Supported version recommended by the panel |
| Application mode | Production |
| Application root | apps/myapp |
| Application URL | example.com |
| Startup file | app.js |
The finished form should resemble the following pattern. Add environment variables such as NODE_ENV=production, DATABASE_URL, SESSION_SECRET and REDIS_URL without placing their values in Git.
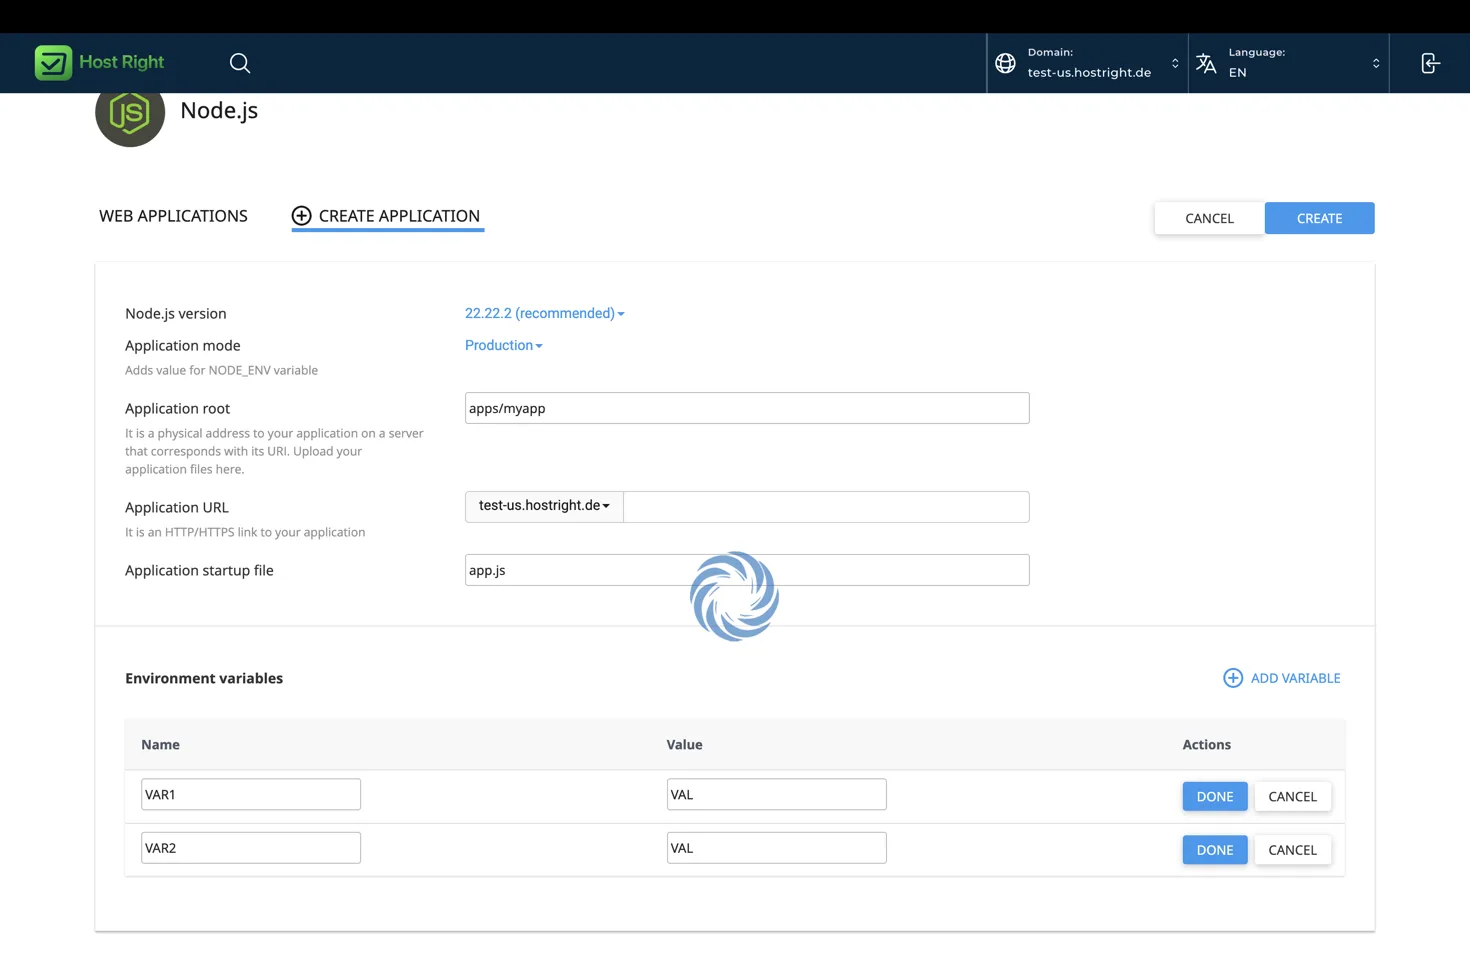
Select Create. The interface may display a short provisioning state while the application is registered.
Upload code and install dependencies
Git is best for repeatable deployments:
mkdir -p ~/apps
cd ~/apps
git clone YOUR_REPOSITORY_URL myapp
cd myapp
npm ci
npm run build
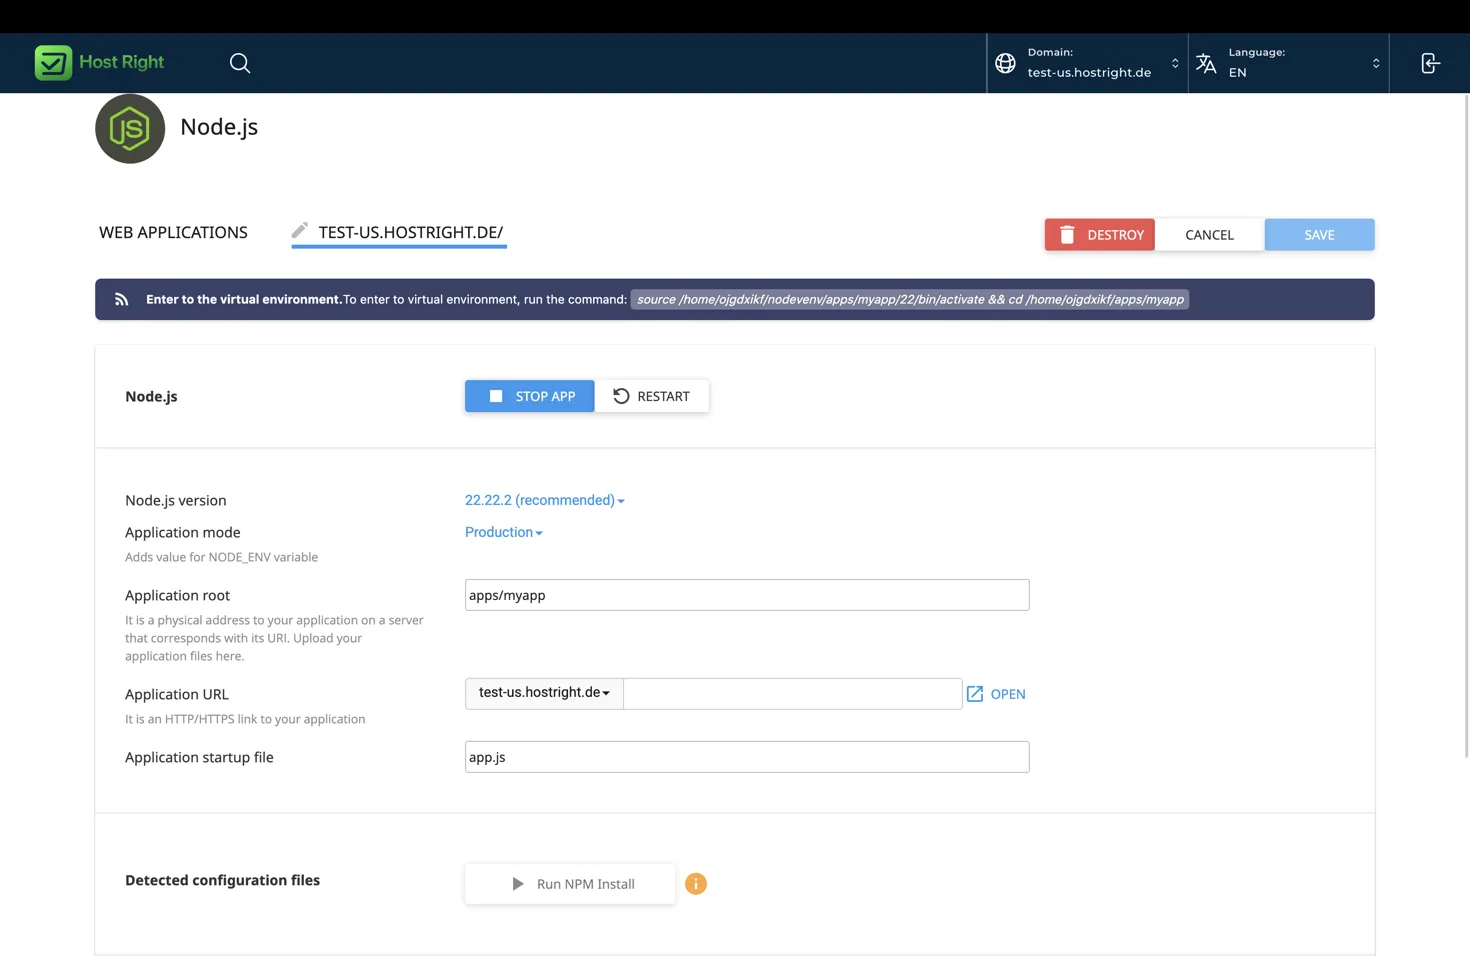
Use the environment command displayed on the application details page before running project commands. It activates the managed Node.js environment and changes into the application root. The exact path contains your account name, application path and selected runtime, so copy it from the panel instead of guessing.
If you upload from a local computer, use SFTP over SSH. FTP remains available for older workflows, but SFTP is safer because it encrypts the transfer. Keep node_modules out of the upload when possible and install on the server with the lockfile.
- SSH guide and SFTP guide
- FTP guide
- Git deployments can be performed through the SSH workflow described above.
The application details page can also expose Run NPM Install. Use it after uploading a package.json, then restart the application after the install completes.
A small Express example
The startup filename from the form must exist in the application root. For Express, app.js can be:
const express = require('express');
const app = express();
const port = Number(process.env.PORT || 3000);

app.use(express.json());
app.use(express.static('public'));

app.get('/health', (request, response) => {
  response.json({ ok: true });
});

app.listen(port, '127.0.0.1', () => {
  console.log('Application started');
});
The important detail is process.env.PORT. Do not hard-code a public port and expect the domain to route to it. The managed application layer supplies the port and maps the public URL.
The same hosting model works for Fastify, NestJS and many Express-based services. Next.js and Nuxt need a production build before their server entry point is started. Read the Node.js knowledge-base guide for framework-specific examples.
Databases and Redis
Create a database from the hosting tools, grant the application user the required permissions, and add the connection values as environment variables. Run migrations from the managed application environment before restarting the site.
Redis is useful for sessions, queues, rate limits and hot data. Create or enable the Redis service from the panel, then configure the Node.js client with the socket or connection value shown in the Redis tool. Keep the Redis value private and use the Redis setup guide for the panel-specific details.
SSL and production readiness
After DNS points to HostRight, issue the domain's SSL certificate from the control panel. Test both the root domain and www variant if you use both. Then set secure cookies, configure trusted proxy behavior in your framework, and redirect HTTP traffic to HTTPS where your application requires it.
Before launch, check:
- Production mode is selected.
- The startup file is present and tested.
- npm ci completes without errors.
- The application listens on process.env.PORT.
- Secrets exist only in environment variables.
- Database migrations have completed.
- Redis connectivity has been tested if used.
- HTTPS and the health endpoint work.
- Backups are enabled for the selected plan.
Manage updates without a VPS
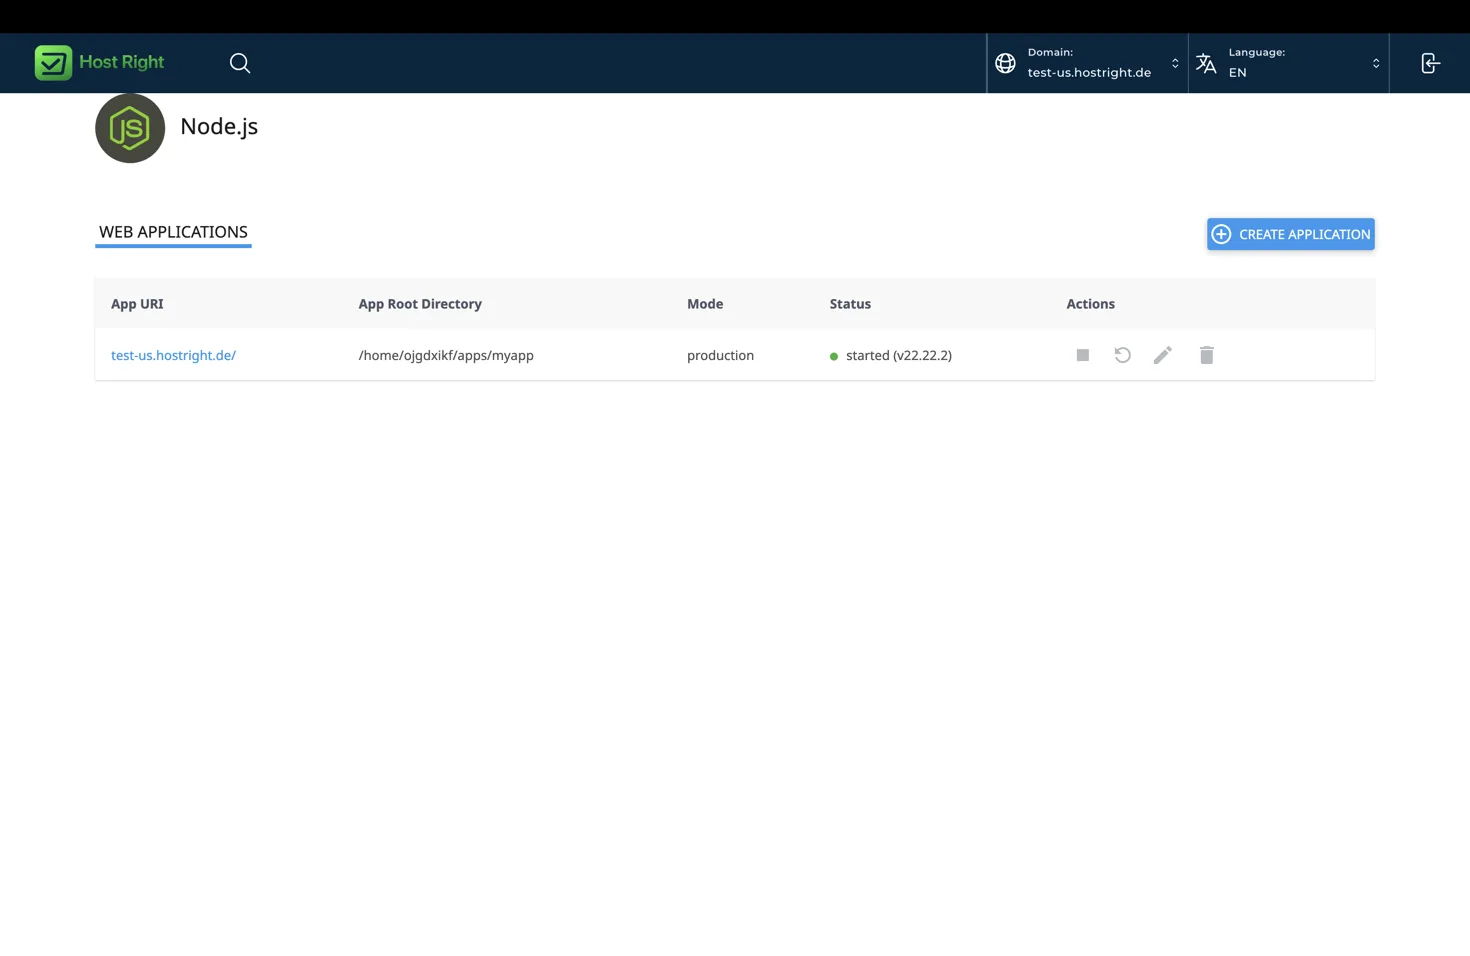
The application list shows the URL, root directory, mode and status. A started application has a green status indicator. Use restart after code changes, dependency changes or environment changes. Use stop when taking the application offline for maintenance, and start it again from the same row.
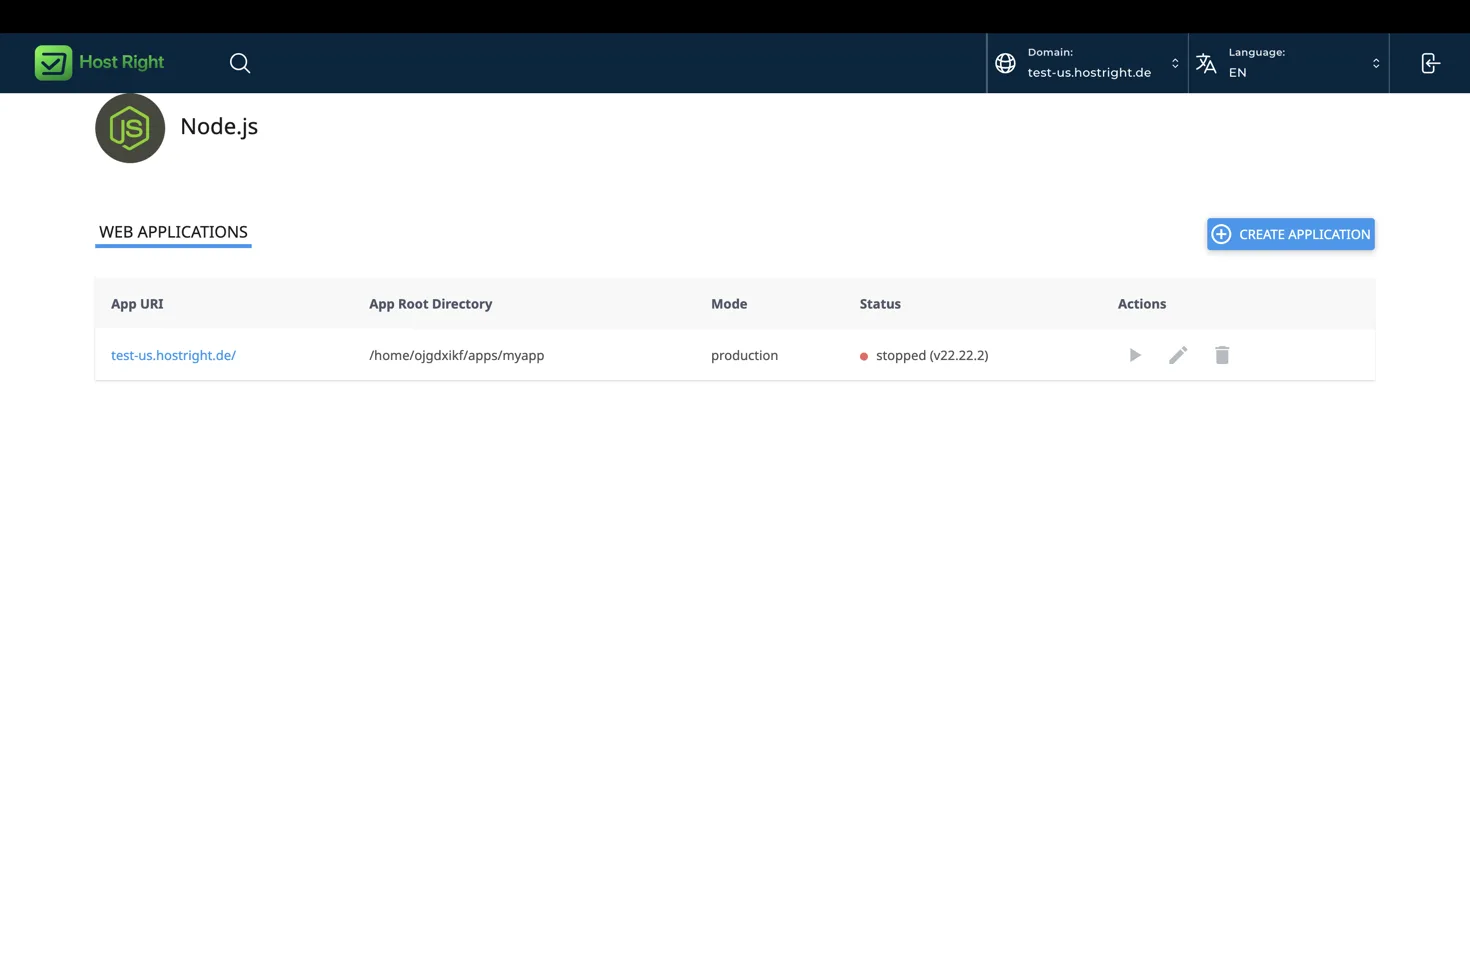
For a Git deployment, the release sequence is:
cd ~/apps/myapp
git pull --ff-only origin main
npm ci --omit=dev
npm run build
Then select Restart in HostRight Control Panel. If the release changes environment variables or the startup file, confirm those values in the application form before restarting.
Pros and limitations
Advantages
- True managed application setup inside the hosting panel
- Production Node.js runtime selection
- Domain mapping without a separate reverse-proxy configuration
- SSH, Git, SFTP and FTP choices
- Database and Redis support for ordinary web applications
- SSL and backups in the same hosting account
- Lower operational overhead than a VPS
- Monthly billing can be used while testing the project
Limitations
- Shared CPU and memory are not equivalent to a dedicated VPS
- Storage is limited by the selected plan
- Long-running workers and very high traffic may need a larger plan or a different architecture
- Applications must fit the supported Node.js versions and managed process model
- Large media libraries should use object storage such as S3-compatible storage rather than filling the web account
For large media, use an S3-compatible bucket and store object URLs in your database. If you need more local storage for a specific workload, contact HostRight support to ask whether a separately priced storage add-on is available for your account.
Conclusion
HostRight is a practical option when you want Node.js without the maintenance burden of a VPS. The workflow is familiar: keep code private, choose a compatible runtime, deploy with Git or SFTP, install dependencies, configure environment variables, enable SSL, and restart from the panel. Start on monthly billing, measure the application, and move to a larger plan when storage, traffic or application capacity requires it.