
Getting started
Your first 15 minutes with HostRight
Set up your HostRight account, connect a domain, publish a basic website, and enable HTTPS.
This guide walks you through your first HostRight setup. You will create an account, order a hosting plan, connect your domain, open the hosting control panel, publish a basic HTML page, and enable an SSL certificate.
By the end, your website should be available through your own domain over HTTPS.
Before you begin
You will need:
- A domain name that you own
- Access to the account where the domain is registered
- A payment method
- A basic HTML file to upload
This guide assumes that HostRight will manage DNS for your domain.
You can also keep your DNS with another provider, such as Cloudflare, but you will need to copy the required website and email DNS records manually. See Manage your domain with external DNS for that setup.
Cloudflare is the recommended external DNS provider when you do not want to use HostRight nameservers.
What you will do
The setup has four parts:
- Order a HostRight hosting plan.
- Point your domain to HostRight.
- Upload a basic website.
- Enable HTTPS.
1. Create your HostRight account
Open dash.hostright.de in your browser.
Select Sign up and create your account. Enter your contact details, email address, and password when prompted.
After signing in, open the Store from the top navigation.
2. Choose a hosting plan
The store lists the available HostRight shared hosting plans.
Choose a plan based on:
- The number of websites you want to host
- The amount of storage you need
- The number of databases and email accounts you expect to use
You can start with a smaller plan and upgrade later.
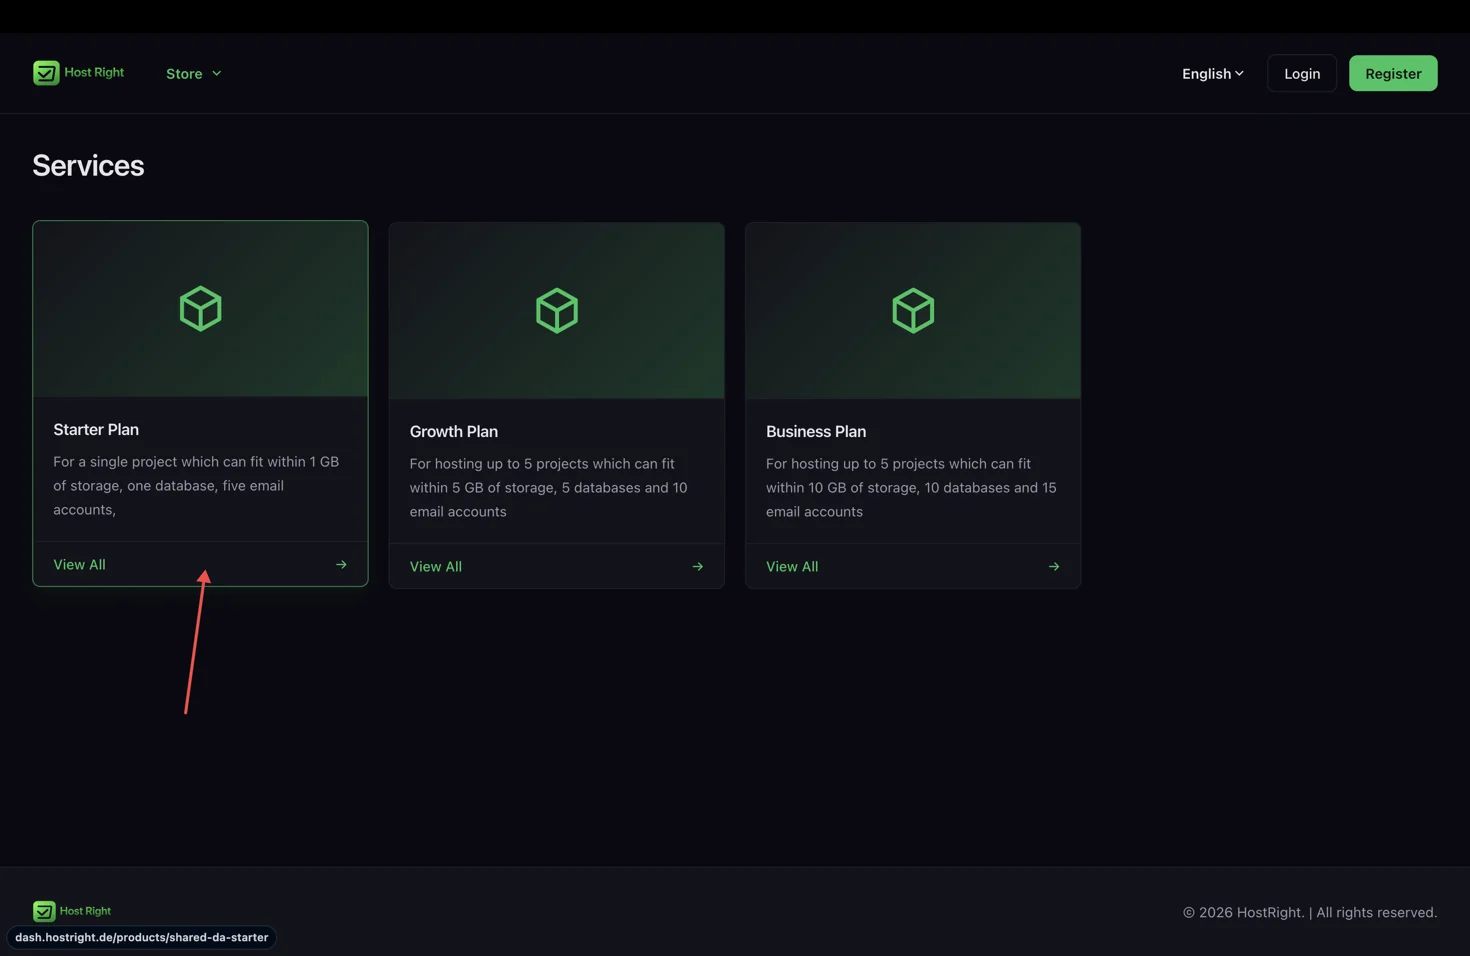
Select View All under the plan you want to order.
3. Choose a server location
Select the location where you want your website to be hosted.
HostRight currently provides location options such as:
- USA
- EU Germany
Choose the location closest to most of your visitors. A nearby location can reduce the time it takes for your website to respond.
The features and price may be the same across locations, but each location runs on separate hosting infrastructure.
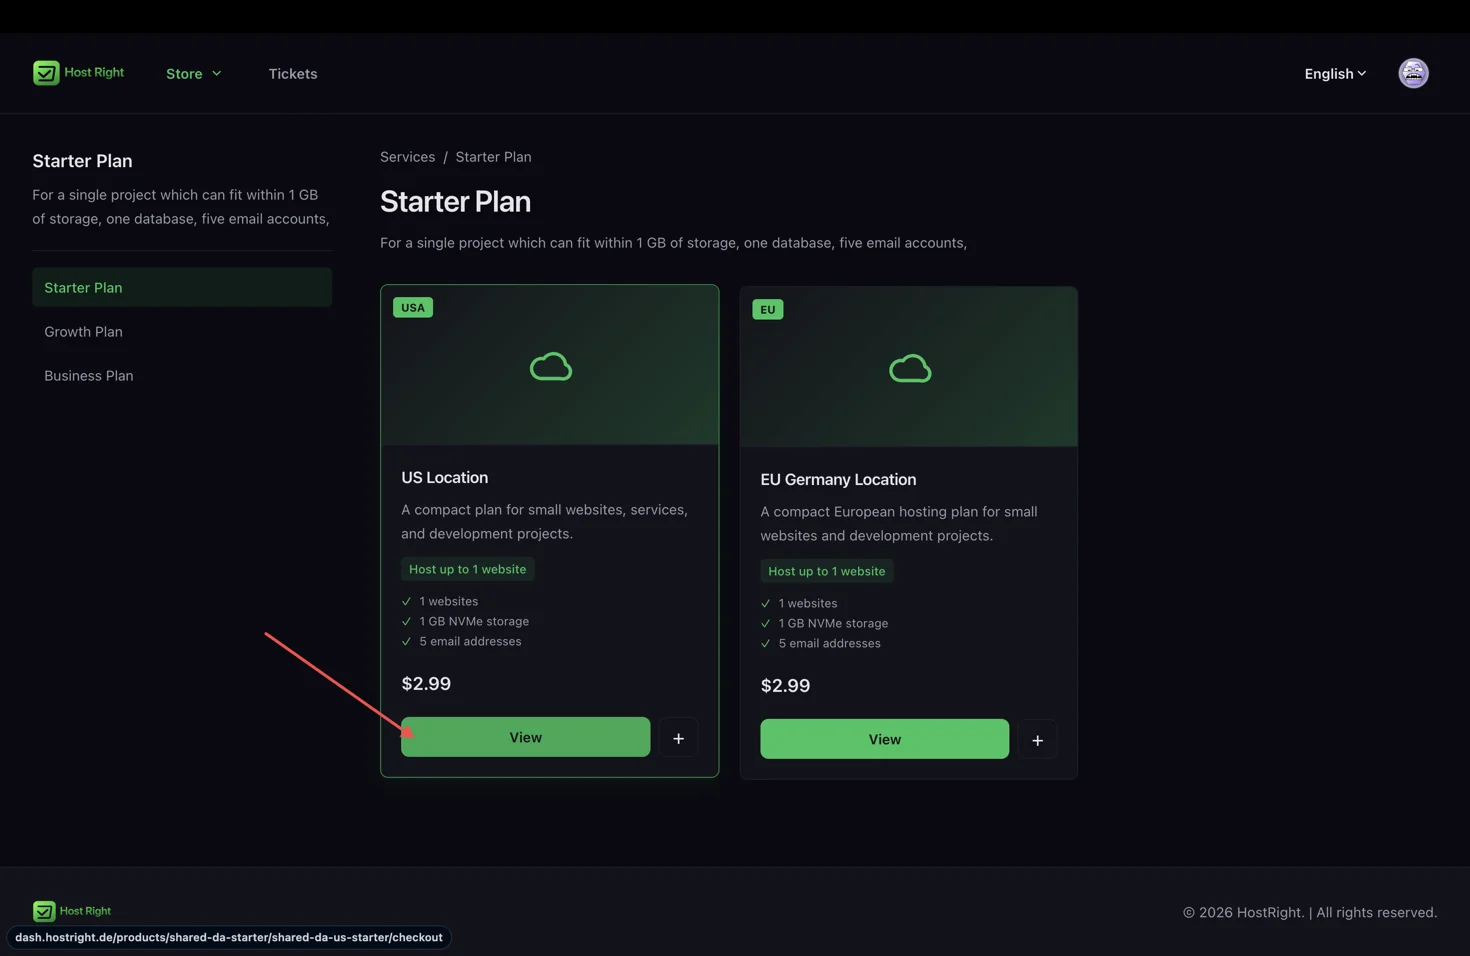 Select View under your preferred location.
4. Enter your domain
Enter the domain you want to use with this hosting service.
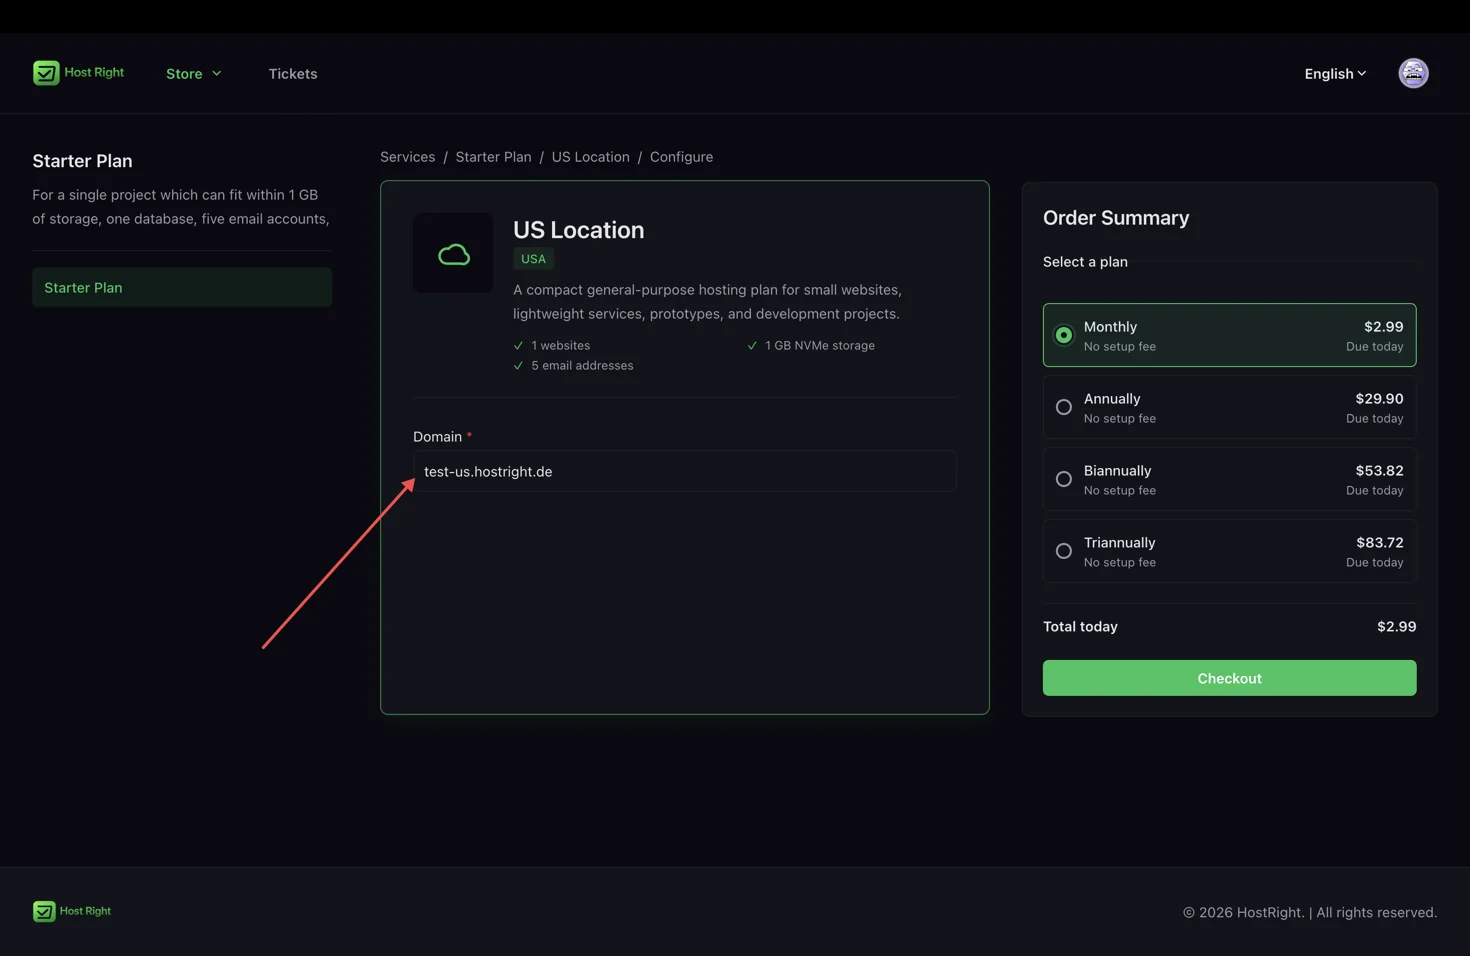
For example:
example.com
Enter only the domain name. Do not include https://, a path, or a trailing slash.
Correct:
example.com
Incorrect:
https://example.com/
example.com/shop
HostRight will configure the hosting account around this domain.
You do not need to transfer the domain registration to HostRight. The domain can remain with your current registrar.
5. Choose a billing cycle and check out
Choose your preferred billing cycle from the order summary.
Available options may include:
- Monthly
- Annual
- Biannual
- Triannual
Review the amount due, then select Checkout.
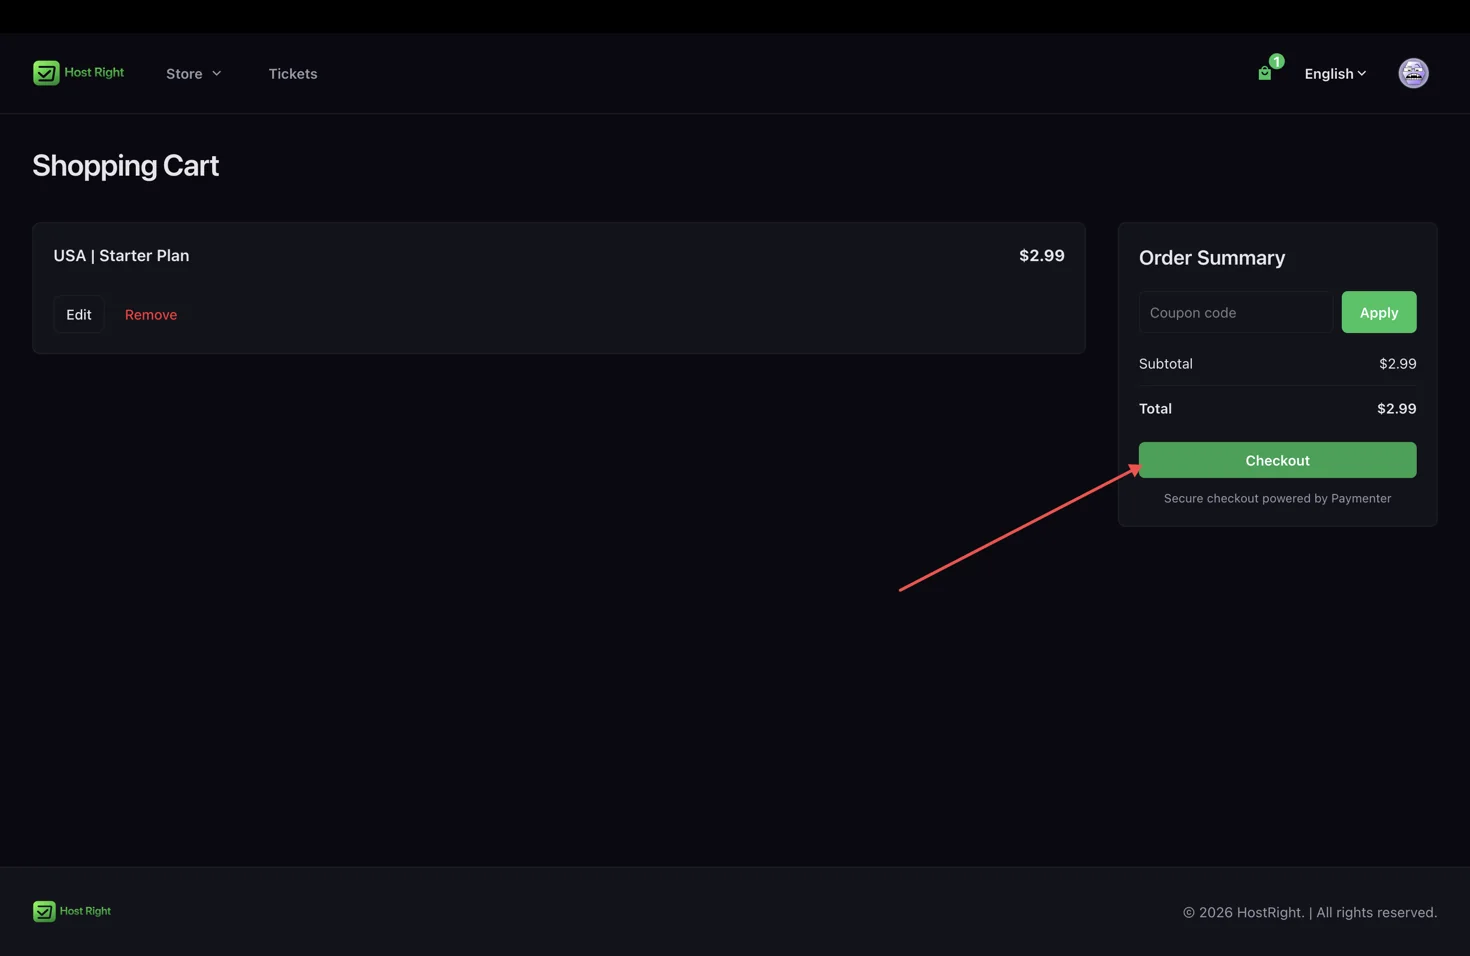
Once checked out; your invoice will be generated; for which please pay with your selected payment method.
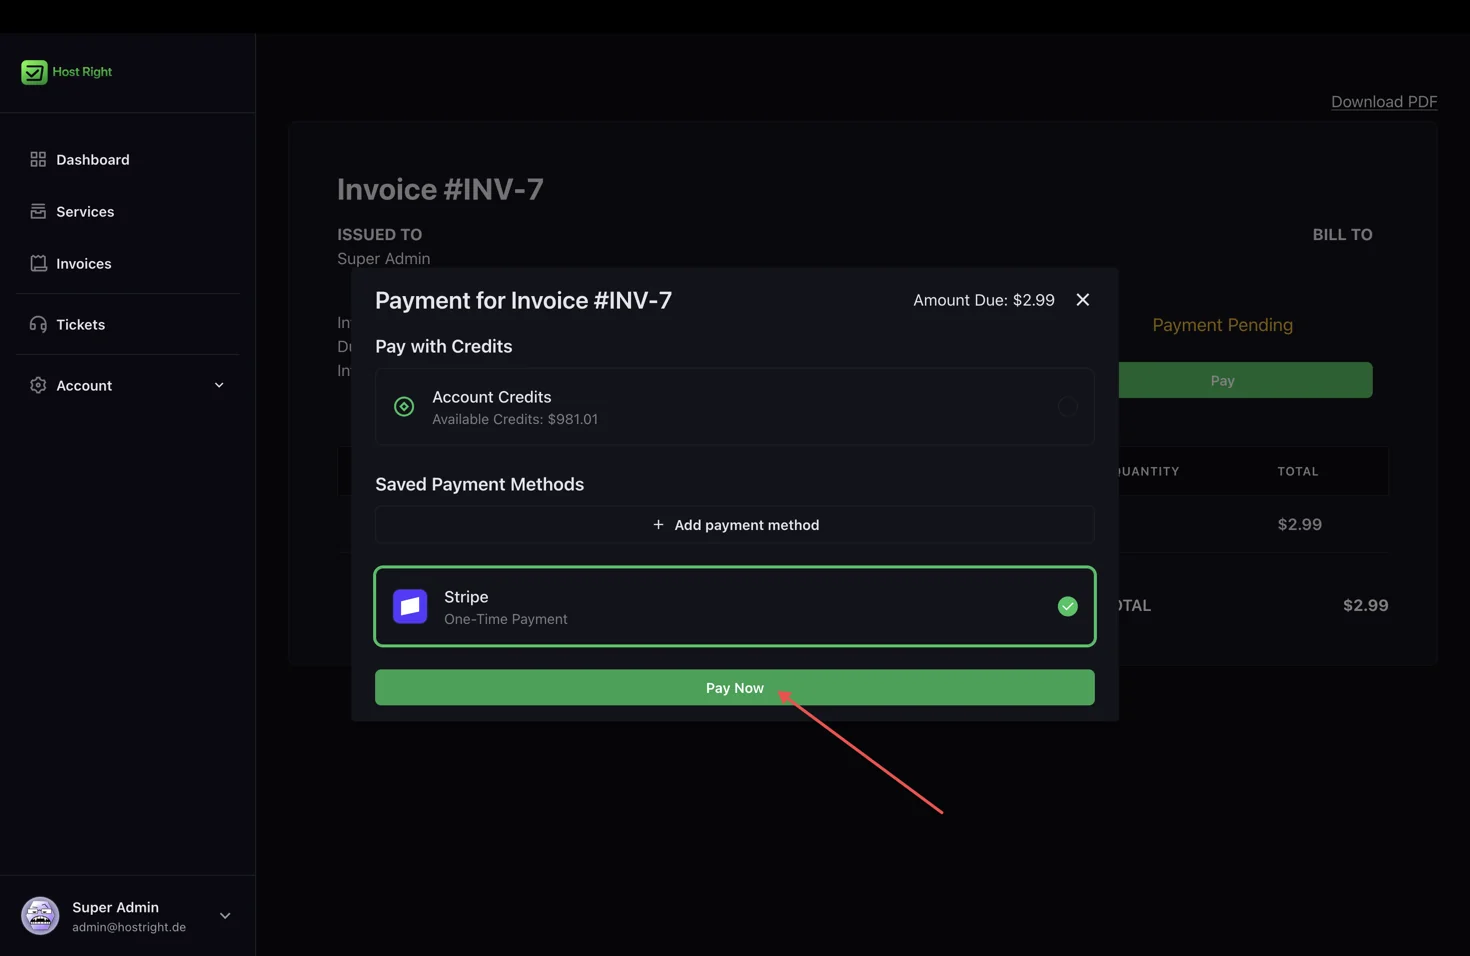
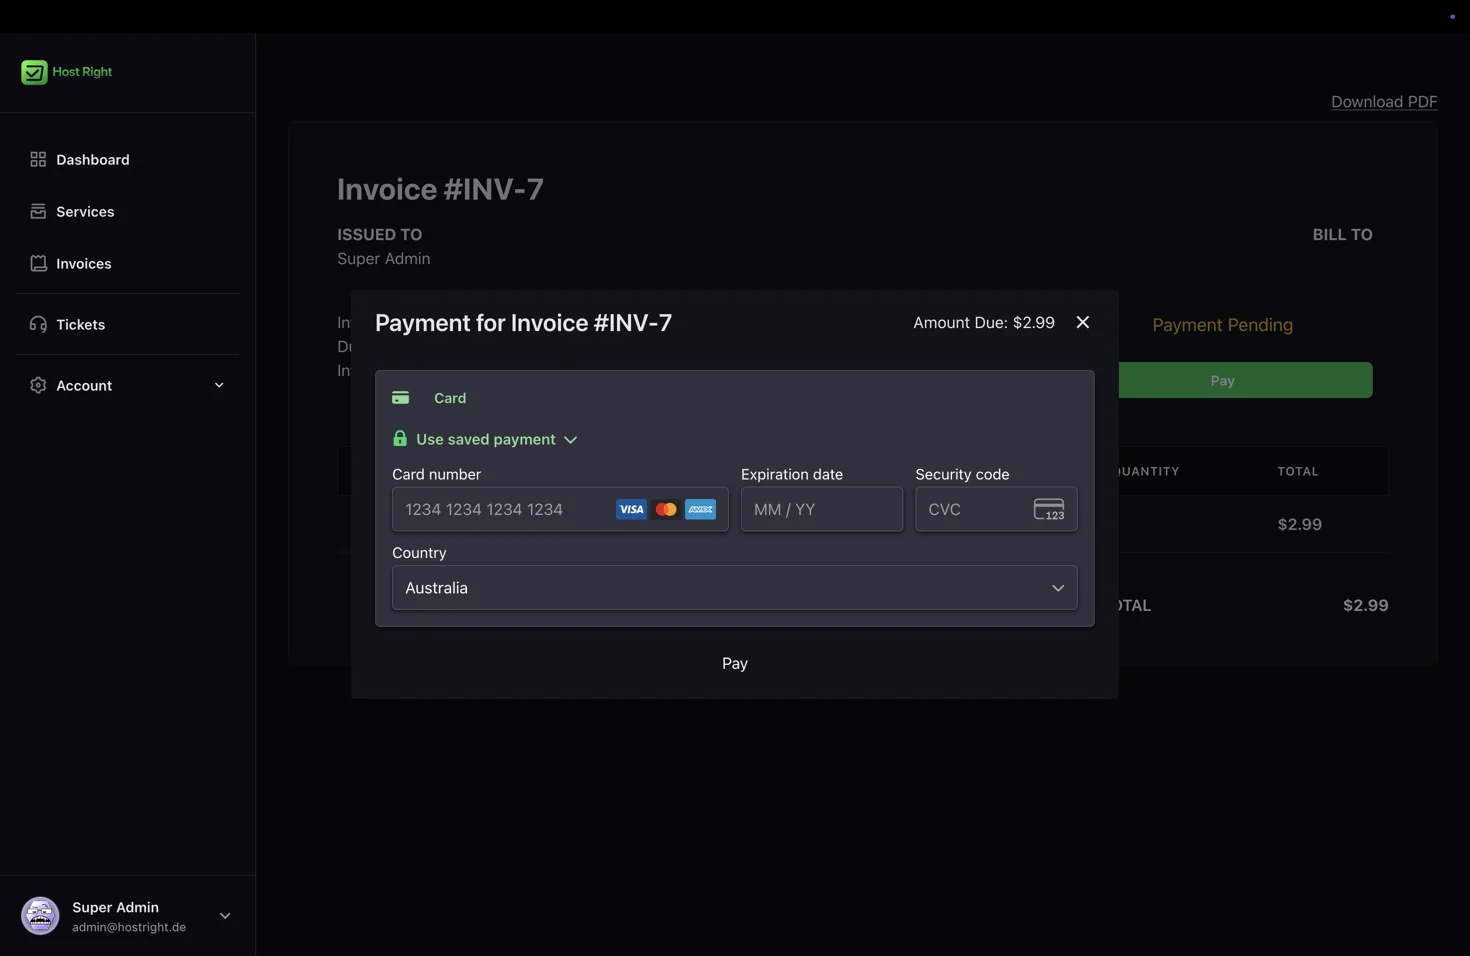
And add your card details
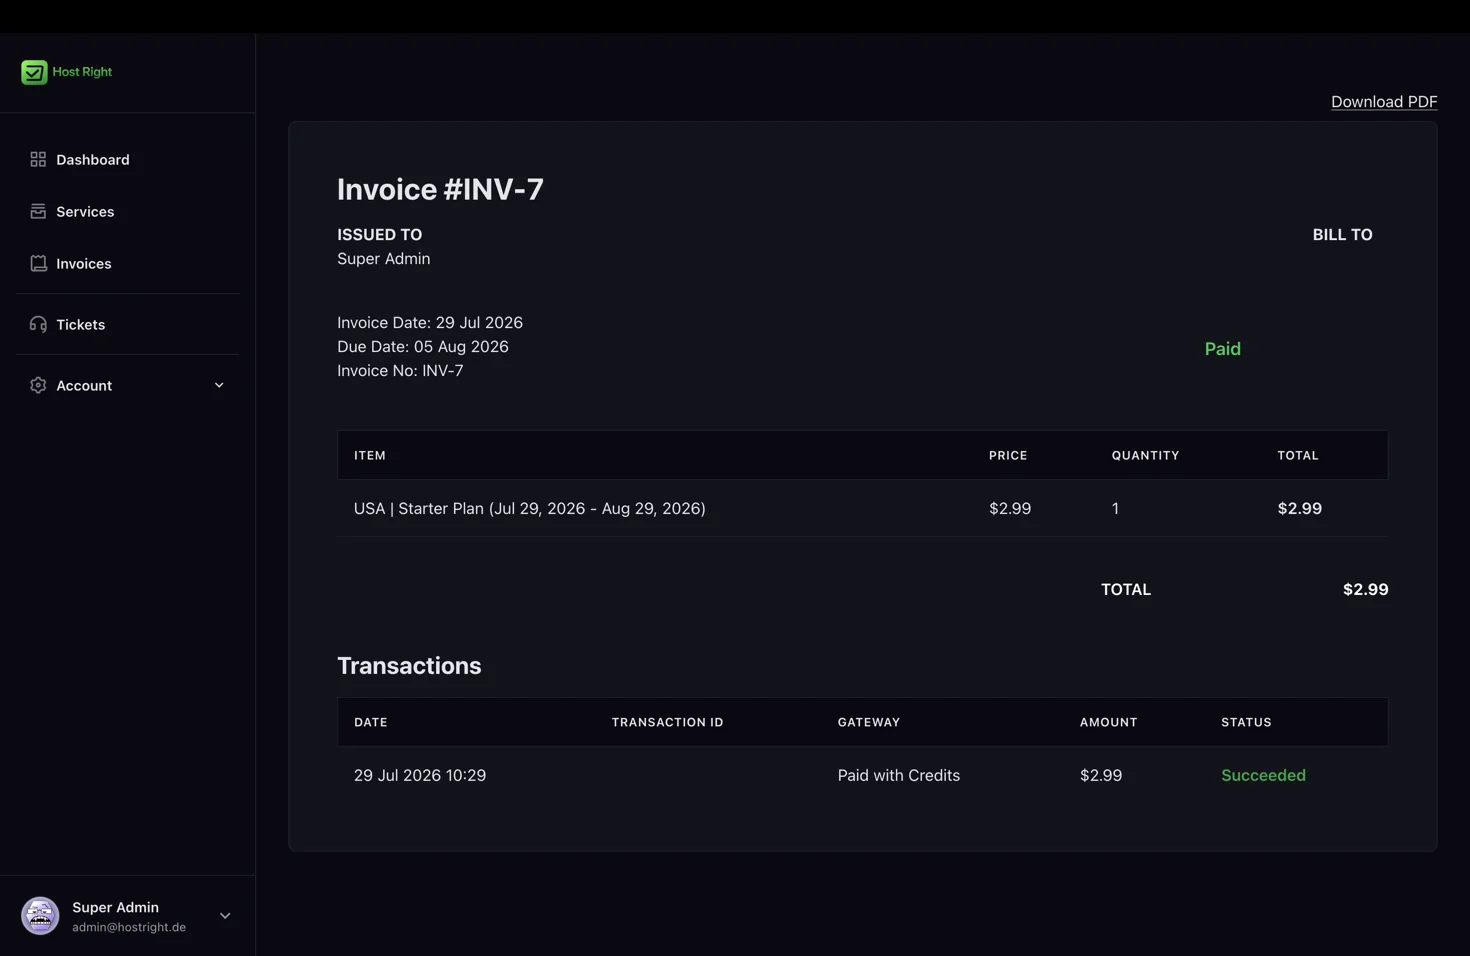
Once paid an invoice will be generated.
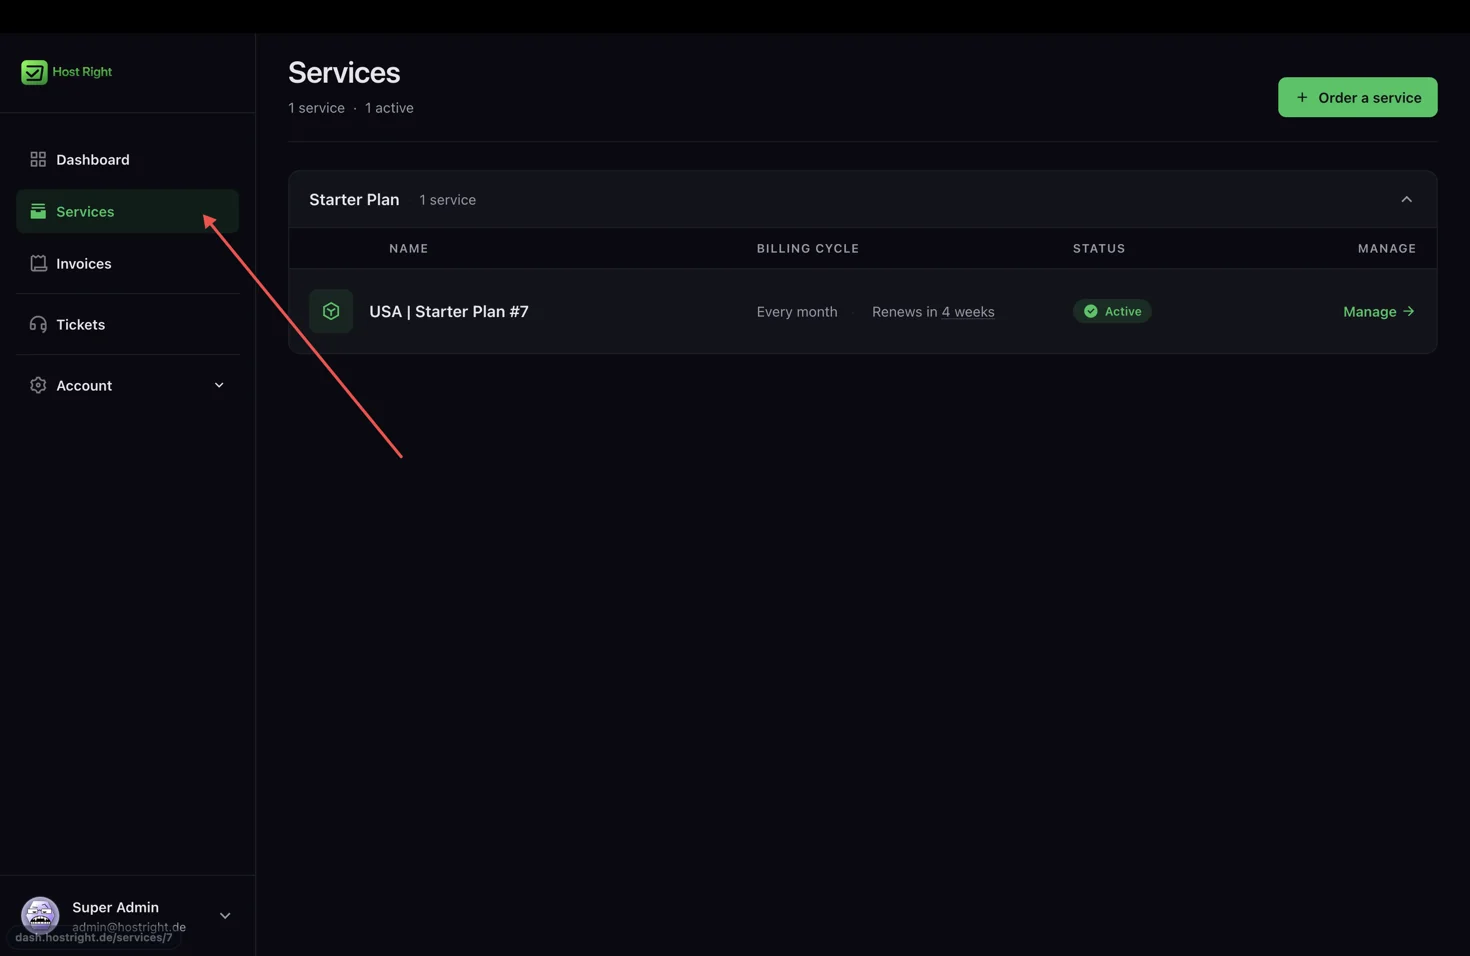
HostRight will begin provisioning the service after the payment is confirmed.
Provisioning may take a few minutes. When it is complete, the new hosting service will appear under Services in your HostRight dashboard.
6. Point your domain to HostRight
Before publishing the website, connect the domain to HostRight.
This guide uses HostRight-managed DNS. With this setup, HostRight manages the DNS records needed for the website, email service, and SSL certificate.
Open your domain registrar
Sign in to the provider where your domain is registered.
Open the domain management page and find the nameserver settings. Depending on the registrar, this section may be called:
- Nameservers
- Custom nameservers
- DNS servers
- Change nameservers
Replace the current nameservers with one for your region:
For Europe/Germany add
ns1.de1.dns.hostright.de
ns2..de1.dns.hostright.de
For USA add
ns1.us1.dns.hostright.de
ns2..us1.dns.hostright.de
Remove any old nameservers unless your registrar specifically requires them to remain.
Save the changes.
Wait for the nameserver change
Nameserver changes are not always immediate. They can take several hours to become visible across the internet, and in some cases may take up to 24 hours.
During this period:
- The domain may still open the previous website.
- The domain may temporarily fail to load.
- HostRight may not be able to issue an SSL certificate yet.
- Email delivery may continue using the previous DNS configuration.
Avoid making repeated nameserver changes while propagation is still in progress. Each change can restart the waiting period.
7. Open your hosting control panel
Return to dash.hostright.de and under the profile icon on top right navigate to dashboard; from there open Services.
Find the hosting service you just purchased and select Manage.
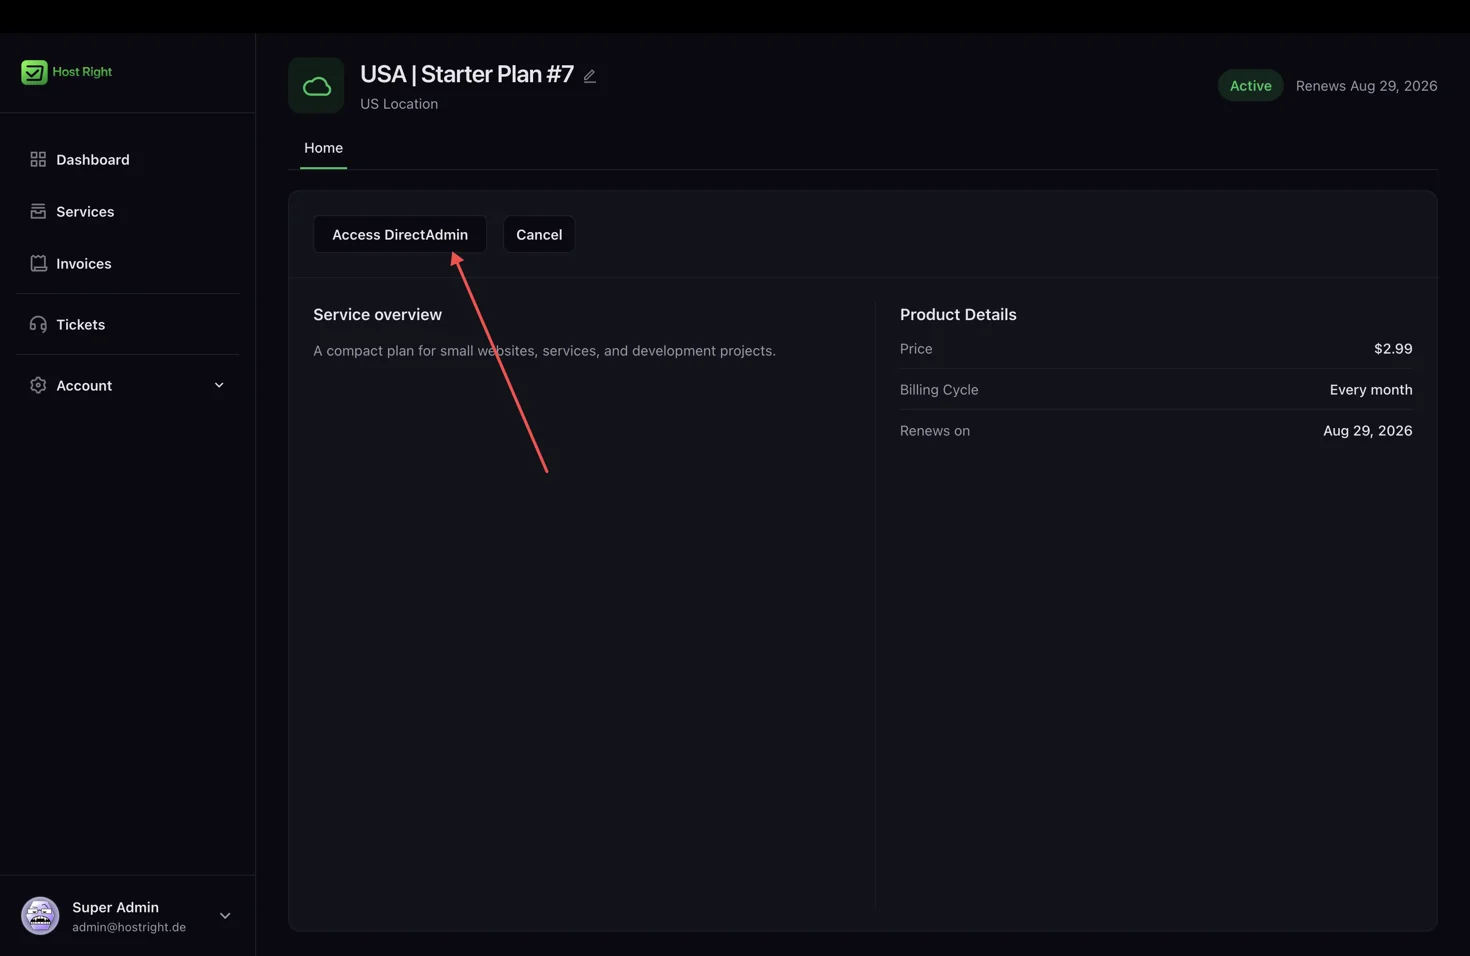
On the service page, select Access the control panel.
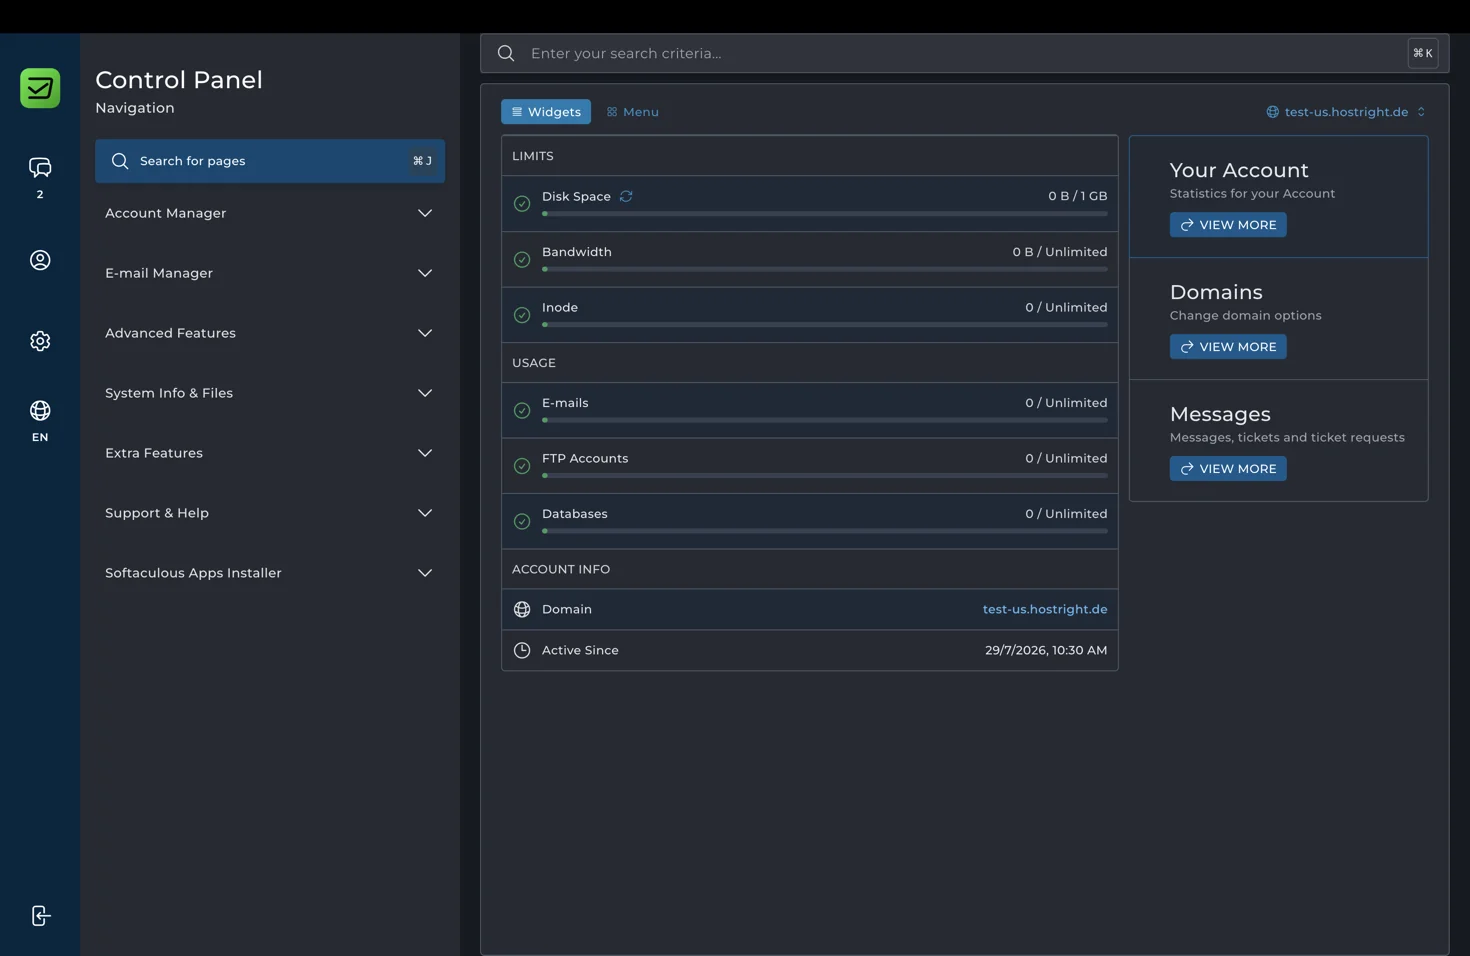
You will be taken to the HostRight Control Panel for your hosting account. HostRight Control Panel is where you manage:
- Website files
- Domains and subdomains
- DNS records
- SSL certificates
- Databases
- Email accounts
- Scheduled tasks
- Backups
You do not need a separate HostRight Control Panel password when the dashboard signs you in automatically.
8. Upload a basic HTML website
For this first setup, publish a simple static HTML page.
Application deployments using PHP, Node.js, Python, or one-click installers have their own setup guides.
Open the file manager
In HostRight Control Panel, open File Manager.
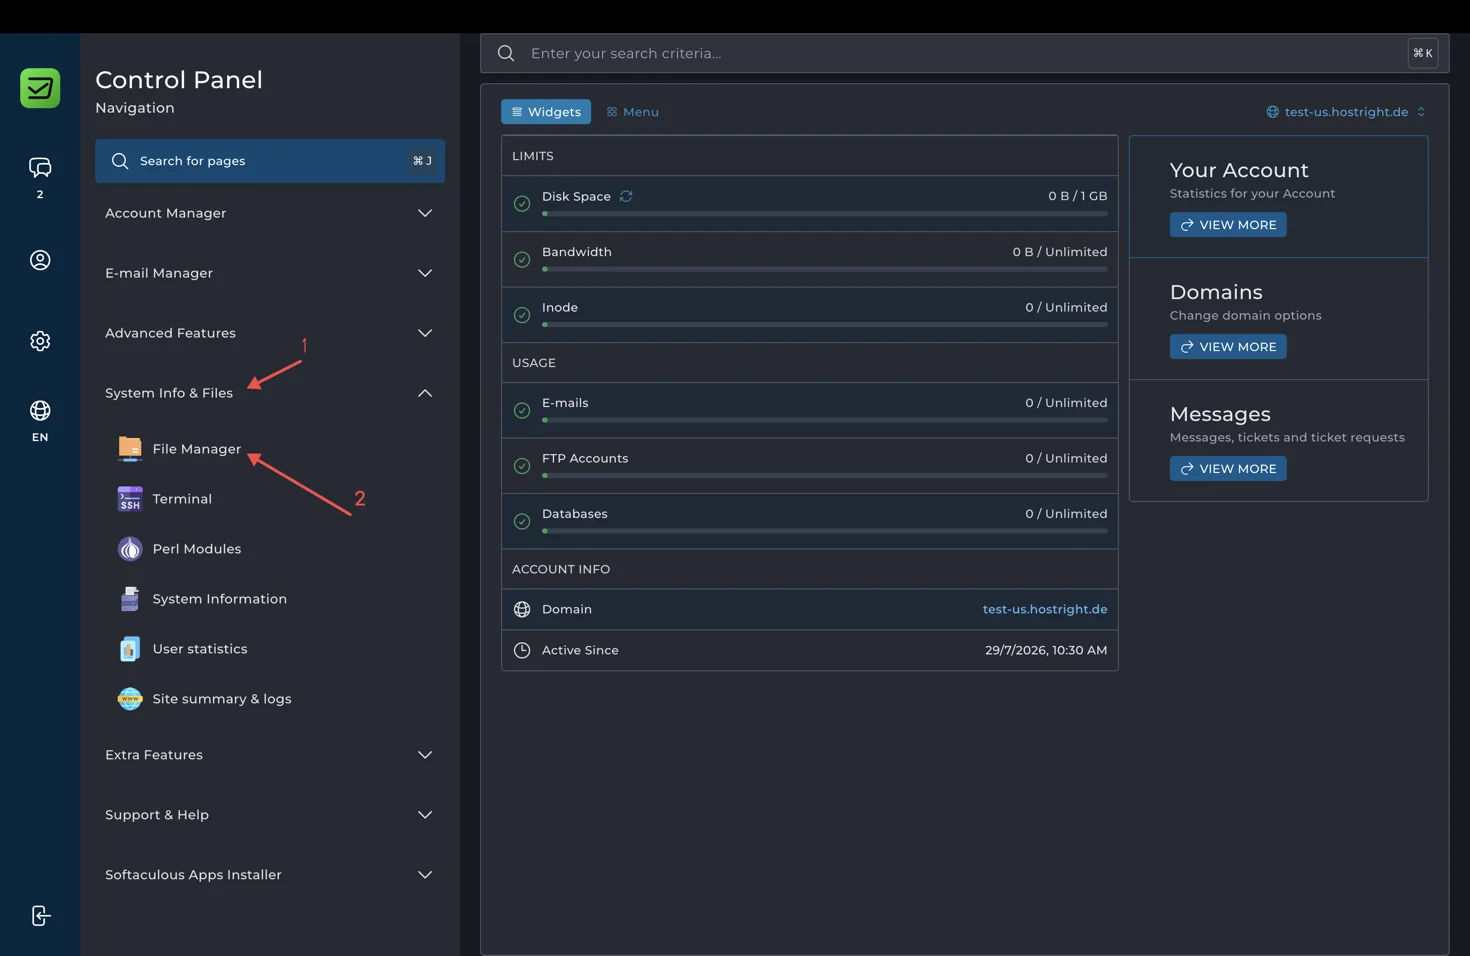
Navigate to your domain directory:
domains/test-us.hostright.de/public_html
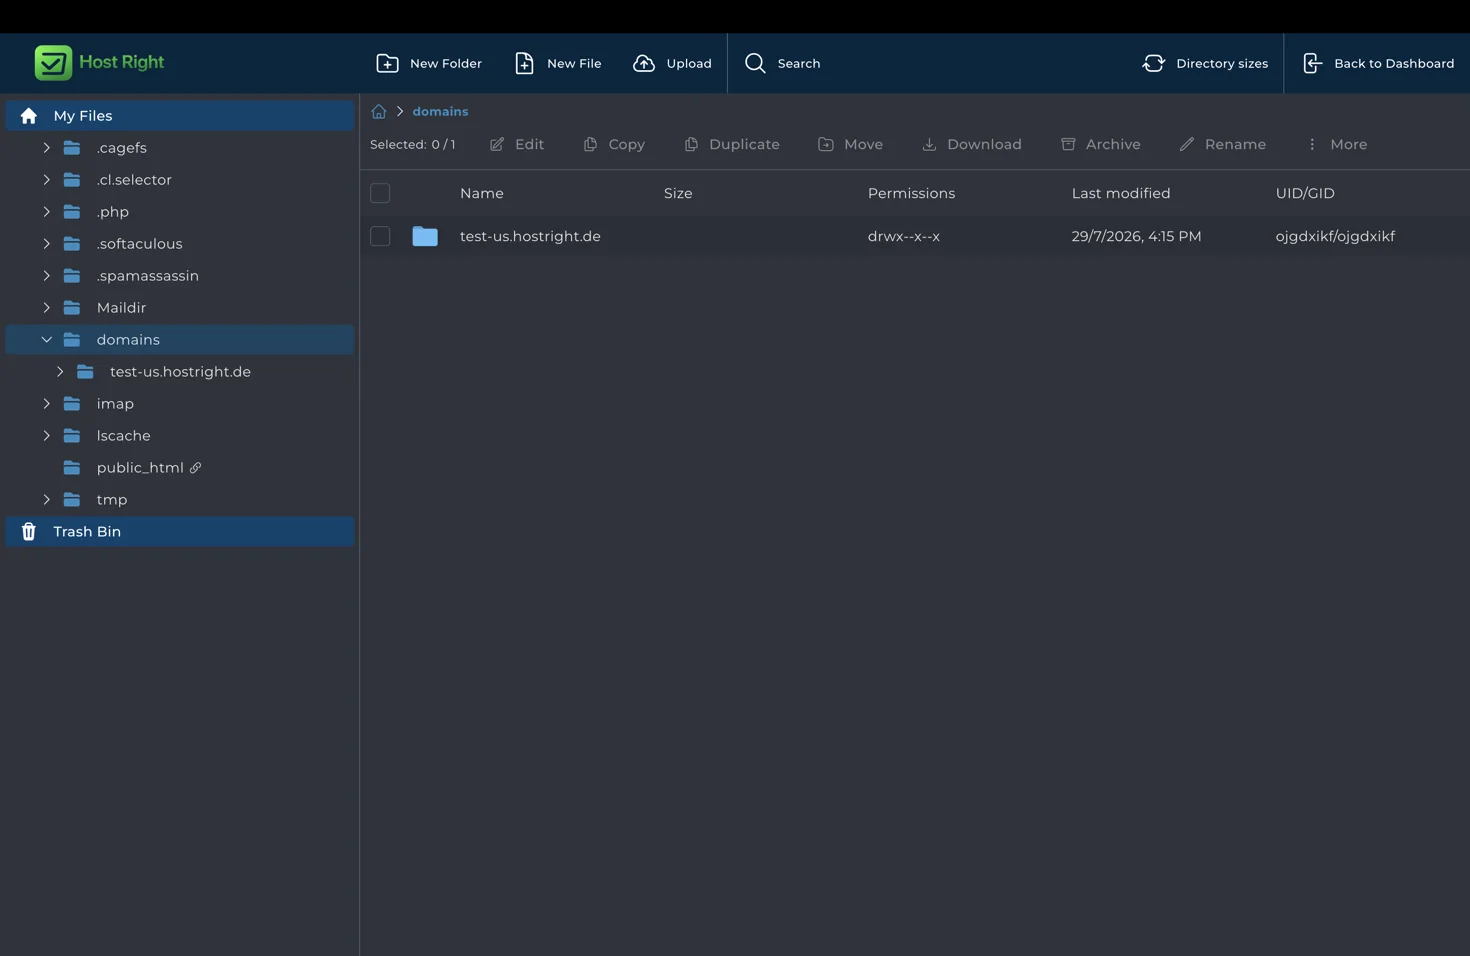
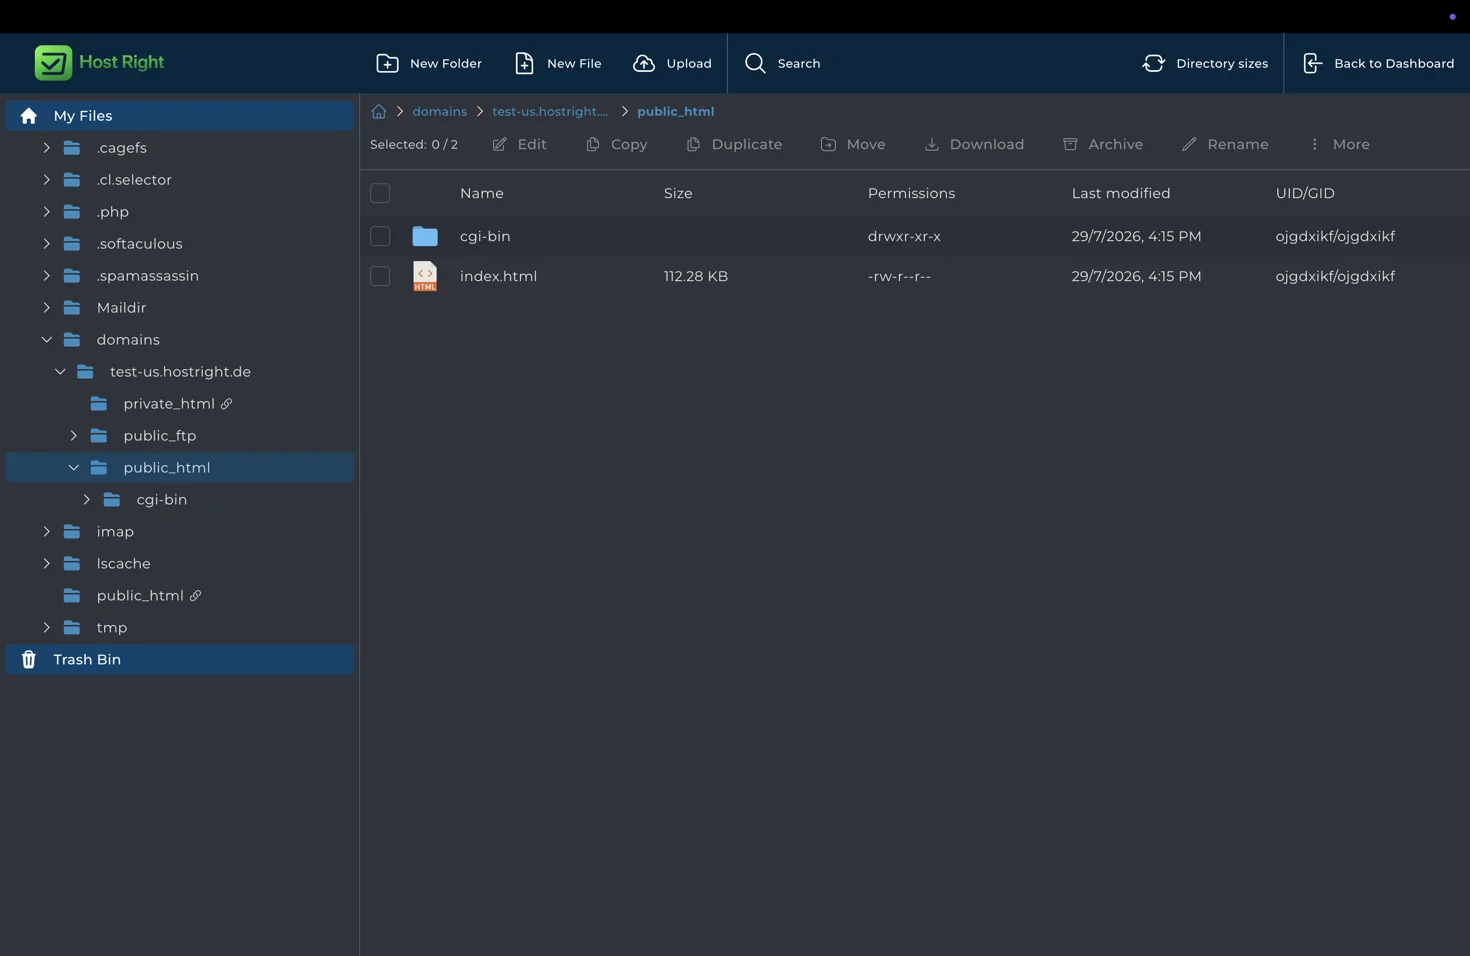
Replace test-us.hostright.de with the domain you entered when ordering the service.
The public_html directory is the public document root. Files stored there can be served through your domain.
Replace the default page
You may see a default index.html file inside public_html.
Delete that file or rename it if you want to keep a copy.
Upload your own file and make sure its name is:
index.html
The filename is case sensitive. Index.html and INDEX.HTML may not be treated as the default page.
You can use the following page for testing:
<!doctype html>
<html lang="en">
<head>
  <meta charset="utf-8">
  <meta name="viewport" content="width=device-width, initial-scale=1">
  <title>My HostRight website</title>
</head>
<body>
  <main>
    <h1>My website is running on HostRight</h1>
    <p>This page was uploaded through the HostRight Control Panel file manager.</p>
  </main>
</body>
</html>
Save this as index.html, then upload it to public_html. You can also open the file; edit it and then replace the content then press save.
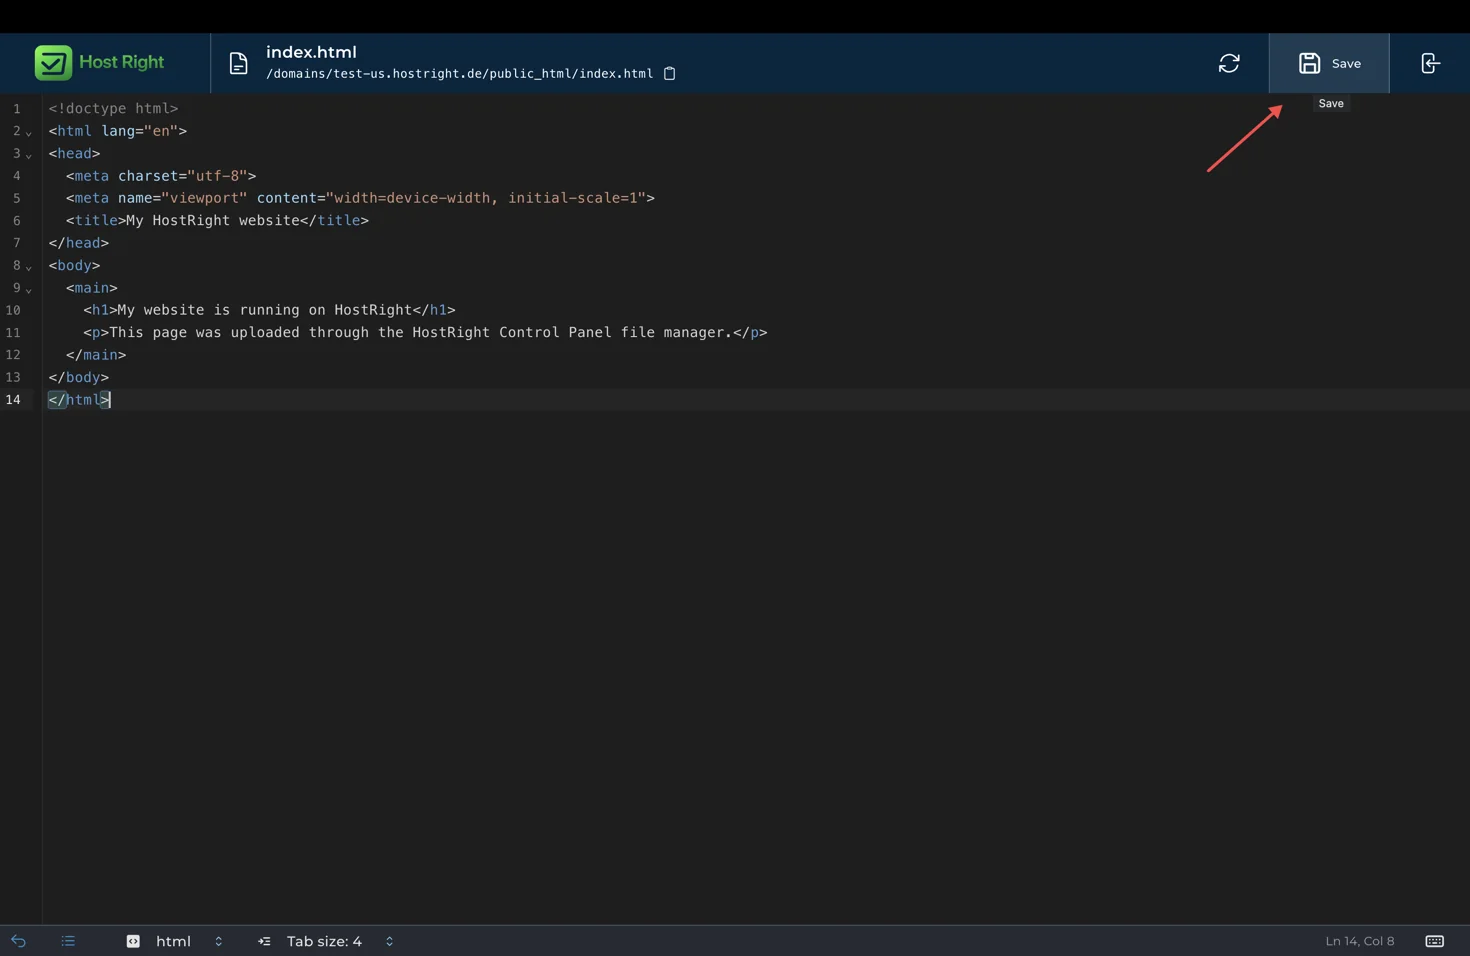
Do not place the file in the domain directory above public_html. Files outside the public document root will not appear on the website.
9. Check your website
Open your domain in a new browser tab:
http://test-us.hostright.de
Replace test-us.hostright.de with your domain.
You should see the HTML page you uploaded.
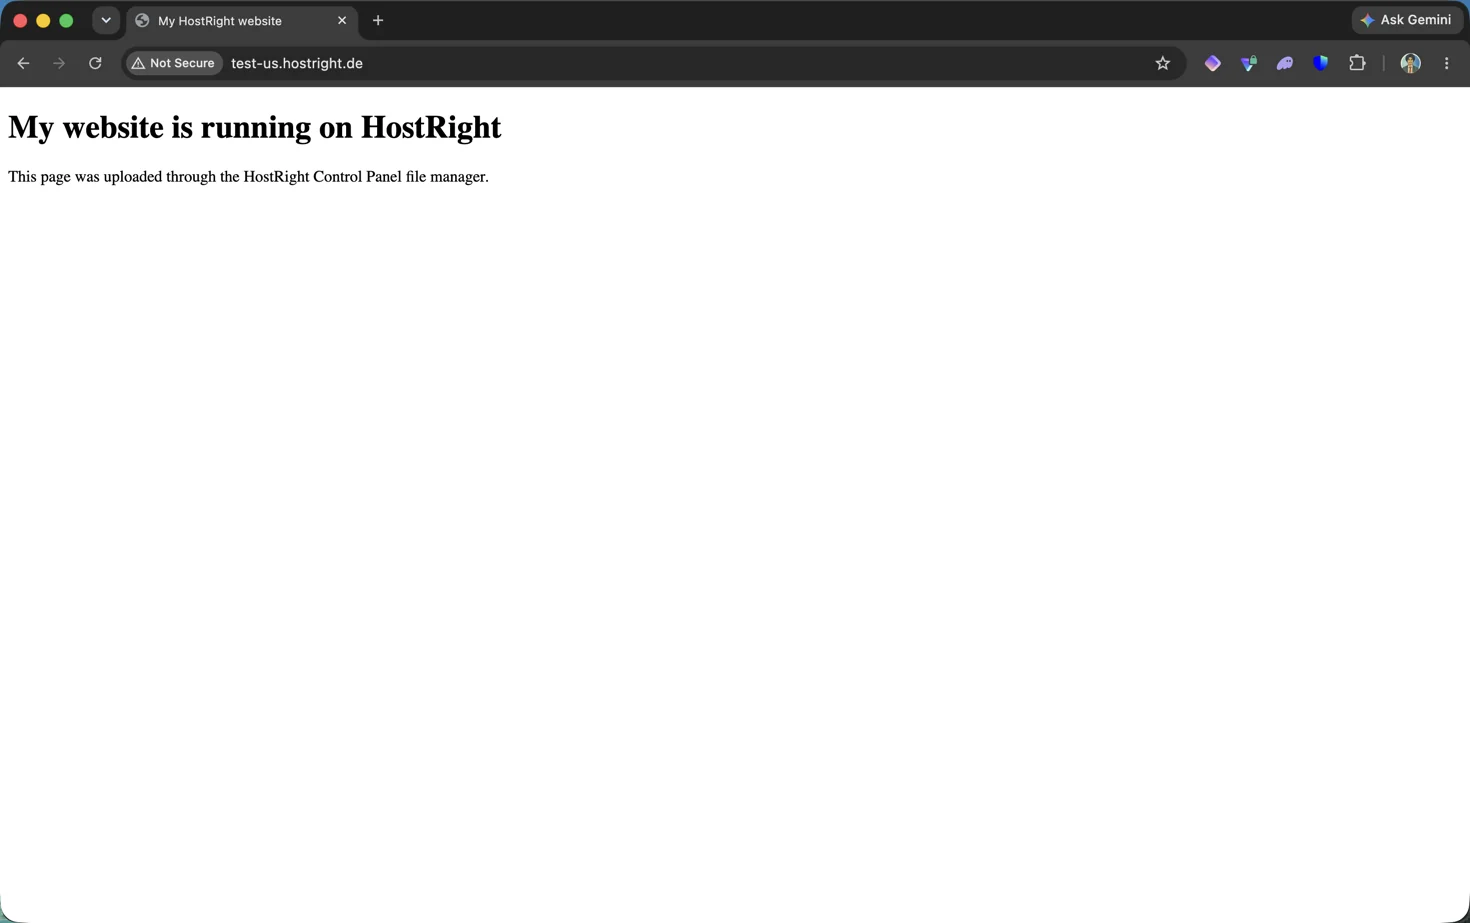
If the domain does not load yet, the nameserver change may still be propagating. You can wait and check again later.
If you see the HostRight Control Panel default page, confirm that:
- Your file is named
index.html. - It is inside the correct
public_htmldirectory. - The old default page has been replaced.
- You are checking the correct domain.
10. Enable an SSL certificate
An SSL certificate allows visitors to open your website through HTTPS.
This section assumes that your domain uses the HostRight nameservers:
For Europe/Germany
ns1.de1.dns.hostright.de
ns2..de1.dns.hostright.de
For USA
ns1.us1.dns.hostright.de
ns2..us1.dns.hostright.de
If you use Cloudflare or another external DNS provider, the required DNS records must point to the HostRight server before certificate provisioning can succeed. Follow Manage your domain with external DNS instead.
Open SSL certificate management
In HostRight Control Panel, return to the main dashboard.
Under Account Manager, select SSL Certificates.
Choose the option to manage or request an automatic certificate.
Select your domain and any hostname variants you want the certificate to cover, such as:
example.com
www.example.com
Request the certificate.
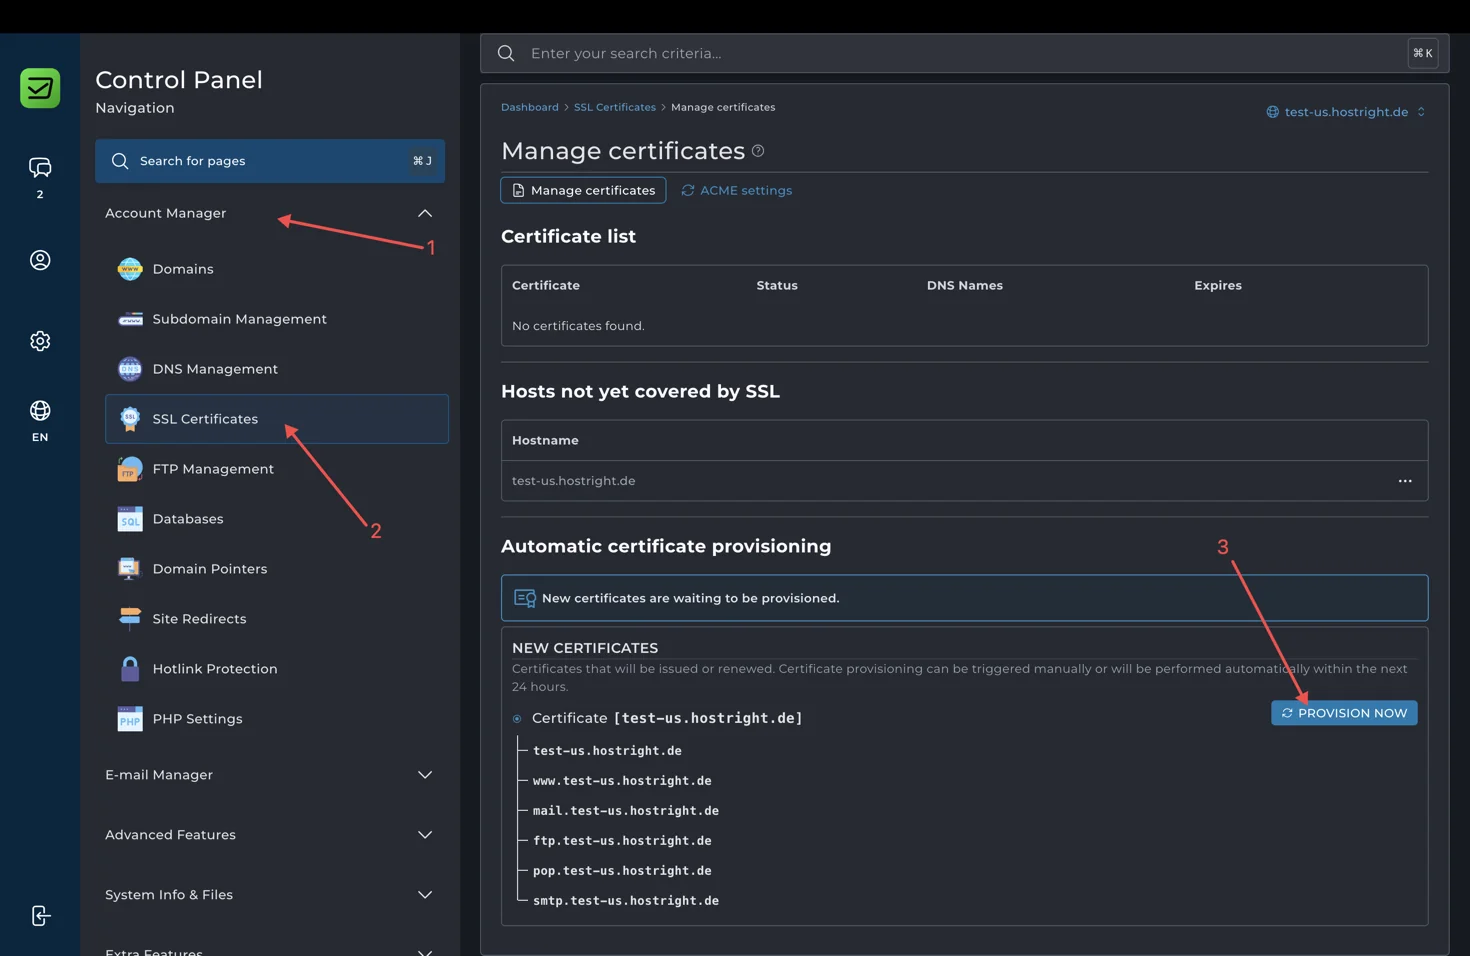
HostRight will verify that the selected hostnames point to the correct server. If verification succeeds, the certificate will be issued and installed.
If certificate provisioning fails
The most common reason is that the domain has not finished moving to the HostRight nameservers.
Confirm that:
- The domain uses both HostRight nameservers.
- The nameservers were entered correctly.
- The domain registration is active.
- You have waited for DNS propagation.
- The domain opens the HostRight-hosted page over HTTP.
- No external DNS provider is still controlling the records.
Wait for DNS propagation before requesting the certificate again.
11. Verify HTTPS
Once provisioned the page will show as following.
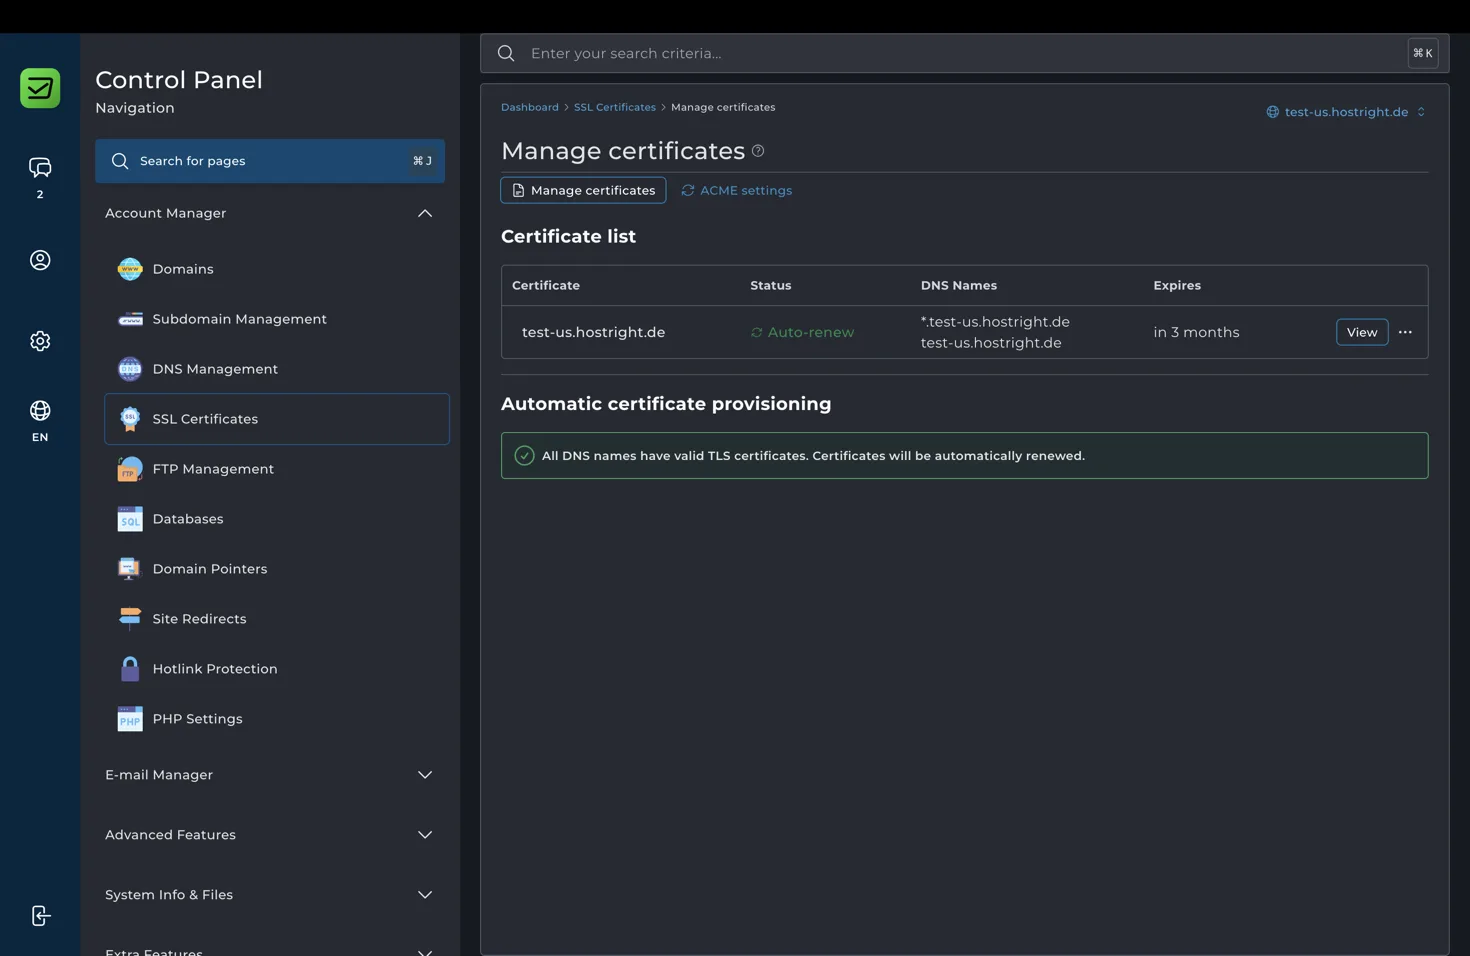
After the certificate is installed, open:
http://test-us.hostright.de
Your browser should load the page without a certificate warning.
Also check:
http://test-us.hostright.de
This address will work only if the www hostname is configured and included in the certificate.
Your first HostRight website is now online with:
- Your own domain
- HostRight-managed DNS
- A basic HTML page
- An SSL certificate
- HTTPS access
Troubleshooting
The service does not appear in the dashboard
Payment may still be processing or the hosting account may still be provisioning.
Refresh the Services page after a few minutes. If the service remains unavailable after payment is confirmed, open a support ticket.
The domain opens the old website
The old DNS configuration may still be cached.
Confirm that your registrar shows these nameservers:
For Europe/Germany
ns1.de1.dns.hostright.de
ns2..de1.dns.hostright.de
For USA
ns1.us1.dns.hostright.de
ns2..us1.dns.hostright.de
Then allow up to 24 hours for the change to propagate.
The domain shows a default hosting page
Check that your index.html file is located inside:
domains/example.com/public_html
Delete or rename any previous default index file.
The website returns a 403 error
A 403 error can appear when the public_html directory does not contain a valid index file.
Make sure the directory contains:
index.html
Also check that you did not upload the file into a nested folder by mistake.
The SSL certificate cannot be issued
First confirm that the website loads over plain HTTP:
http://test-us.hostright.de
If HTTP does not reach the HostRight server, SSL verification will usually fail as well.
Wait for the nameserver change to finish, then request the certificate again.
HTTPS works, but the browser reports mixed content
Mixed content happens when an HTTPS page loads images, scripts, stylesheets, or other resources through http://.
Update those links to use https:// or relative paths.
For example, replace:
<img src="http://test-us.hostright.de/image.png" alt="">
with:
<img src="/image.png" alt="">
Continue with an application runtime
The HTML page confirms that your domain, website directory, DNS, and SSL certificate are working.
You can now replace the test page with your actual website or configure one of the supported application runtimes: