
Hosting tools
How to back up and restore your website
Learn how HostRight backups work, how to use JetBackup, how to create custom cron backups, and how to restore or download a backup.
Backups give you a way to recover your website, files, databases, and email data after an accidental change, failed update, or other problem. HostRight provides automatic backups through JetBackup, and you can also create custom backups with cron jobs or make a manual backup from the control panel.
This guide explains the three backup options available to you:
- Automatic backups through JetBackup
- Custom backups using cron jobs and your own scripts
- Manual backups using Backup and Restore
Automatic backups with JetBackup
HostRight uses JetBackup to create scheduled backups automatically. The backup frequency depends on your hosting plan. The backups run according to the plan specifications, so you do not need to create a backup job for the normal backup schedule.
Open JetBackup
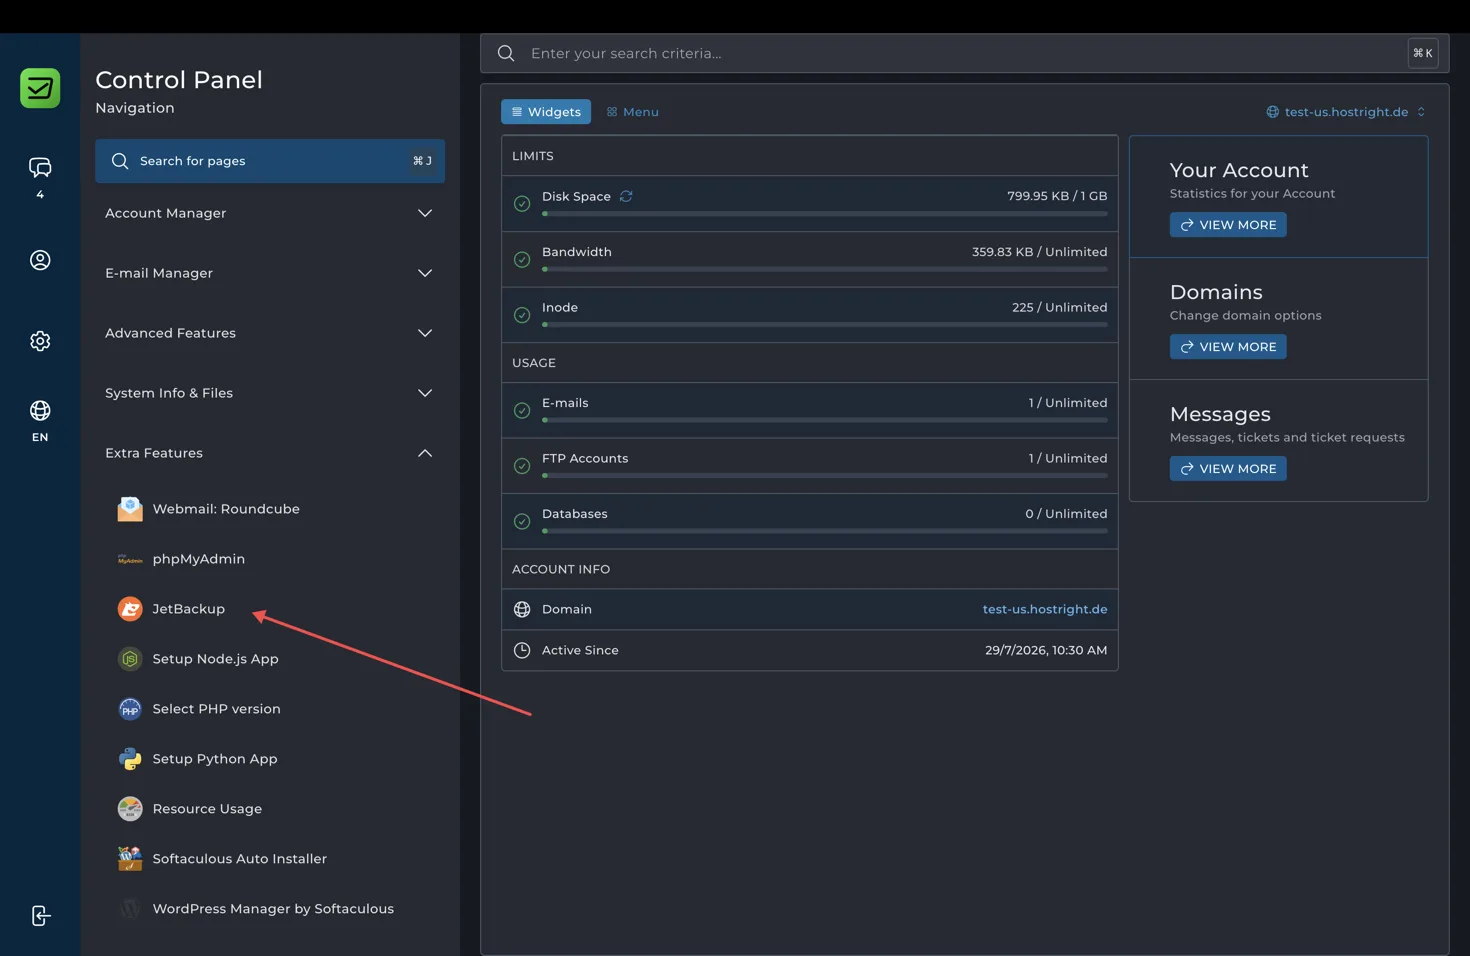
Sign in to your HostRight Control Panel. In the left navigation, expand Extra Features and select JetBackup.
The JetBackup portal shows the available backup areas and the backups that are available for your hosting account.
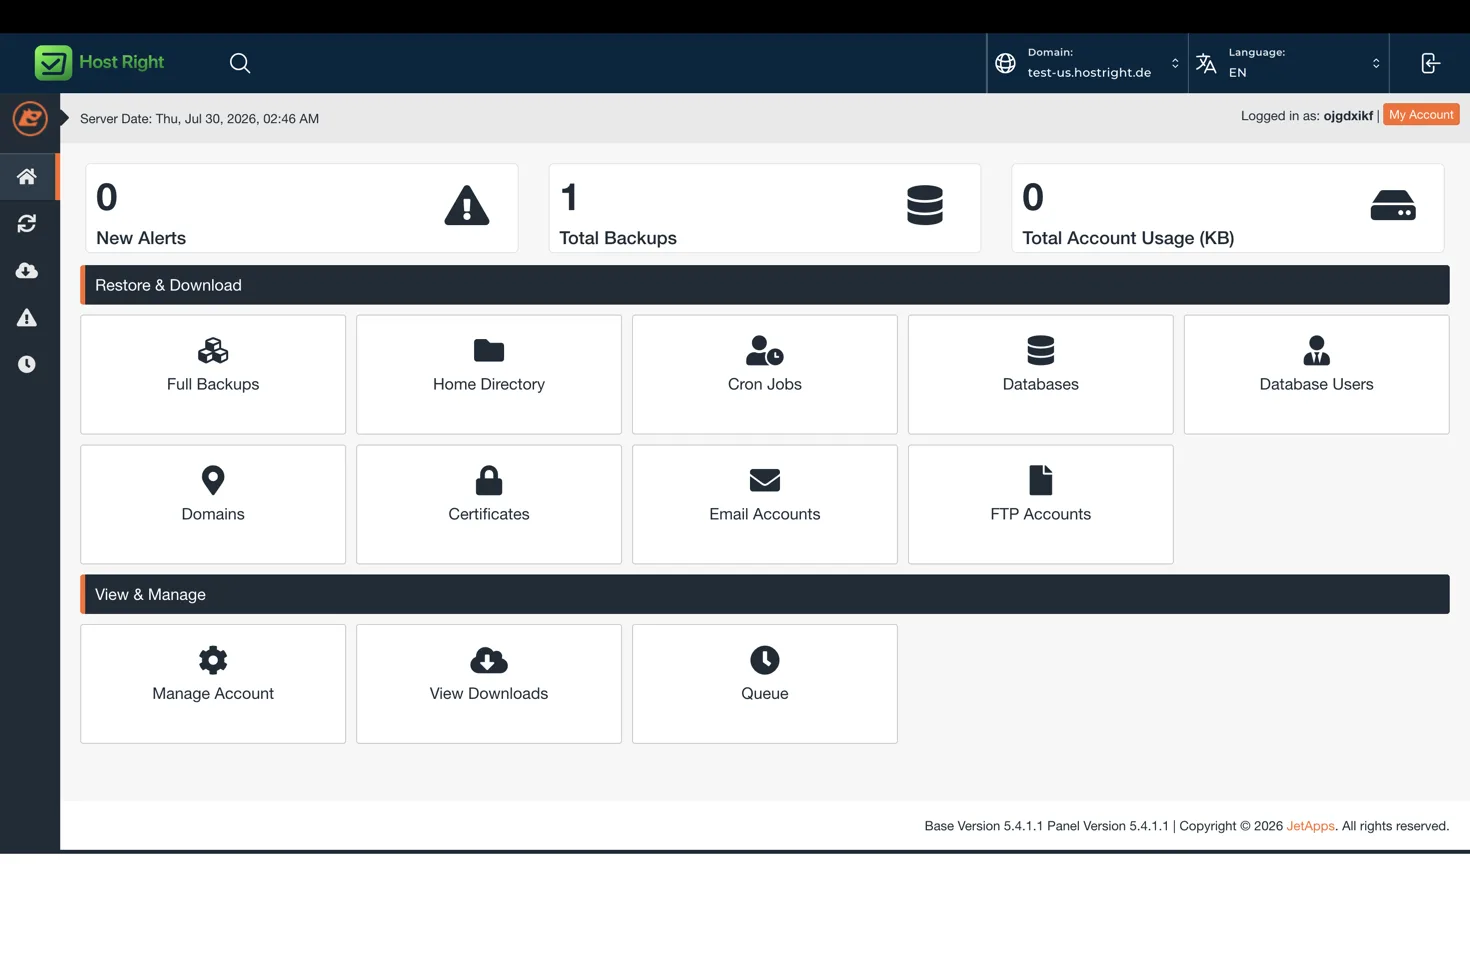
JetBackup can provide access to backups of your account data, including website files and other resources included by the backup configuration. The available backup types and retention period depend on your plan and the backups currently retained for your account.
Download a backup from JetBackup
To download a backup, open the relevant backup area in JetBackup and select the backup you need. JetBackup will present the available download action for that backup.
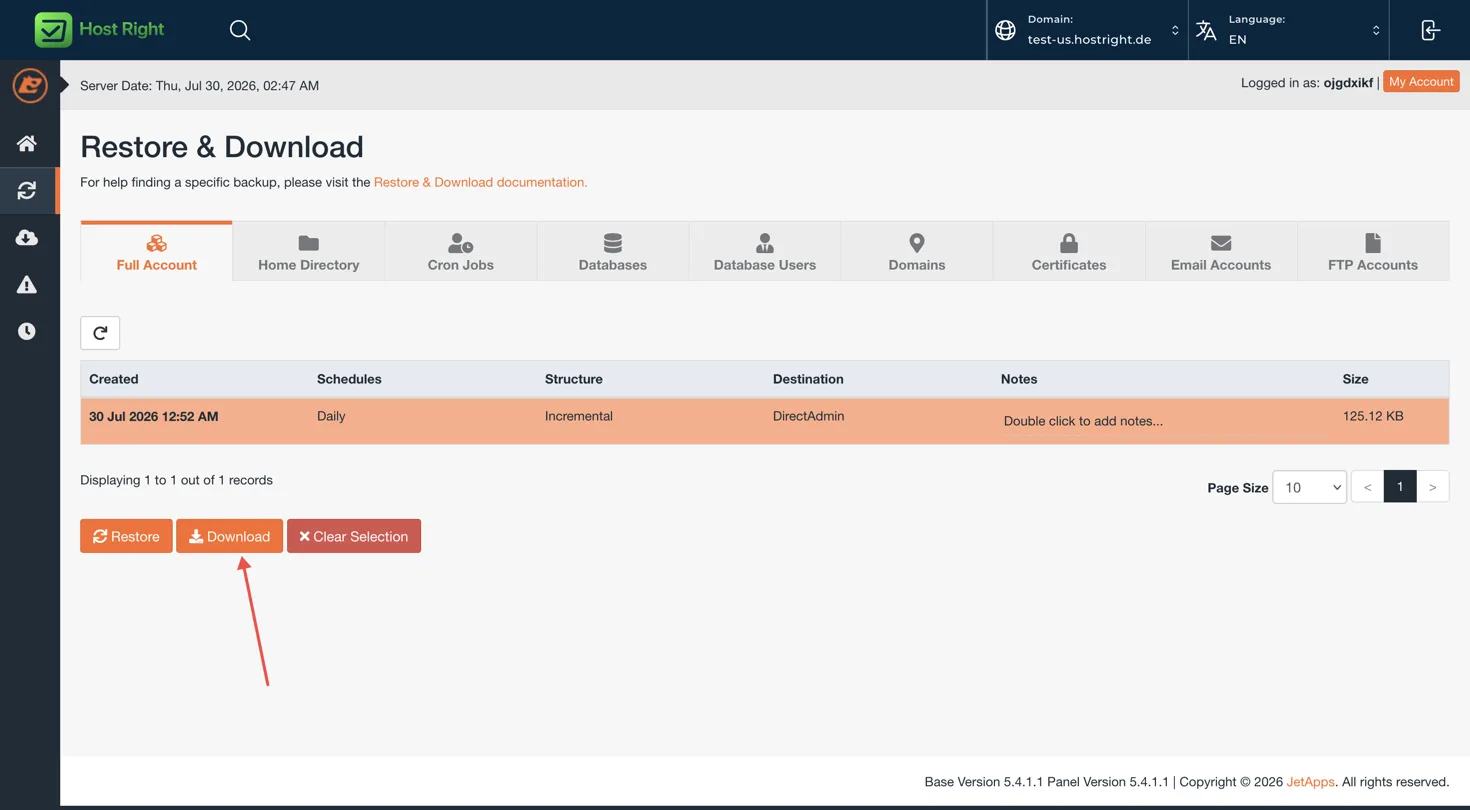
Use downloaded backups when you need an offline copy, want to keep an additional copy before a major change, or need to inspect the backup outside the control panel. Store downloaded backups somewhere secure because they may contain website files, databases, email data, or other private account information.
Custom backups with cron jobs
Automatic JetBackup backups are the normal option for your hosting plan. If you need a different schedule or a custom backup format, you can create a cron job and run your own script.
Read run scheduled tasks with Cron Jobs for the full Cron Jobs workflow, schedule examples, absolute paths, output handling, and safety checks.
Custom cron backups are useful when you want to:
- Create backups more often than the plan schedule
- Keep only selected folders or databases
- Upload a copy to another storage location
- Use a custom naming or retention policy
- Run a Python or shell script for a specialised workflow
Open Cron Jobs
In the Control Panel, expand Advanced Features and select Cron Jobs.
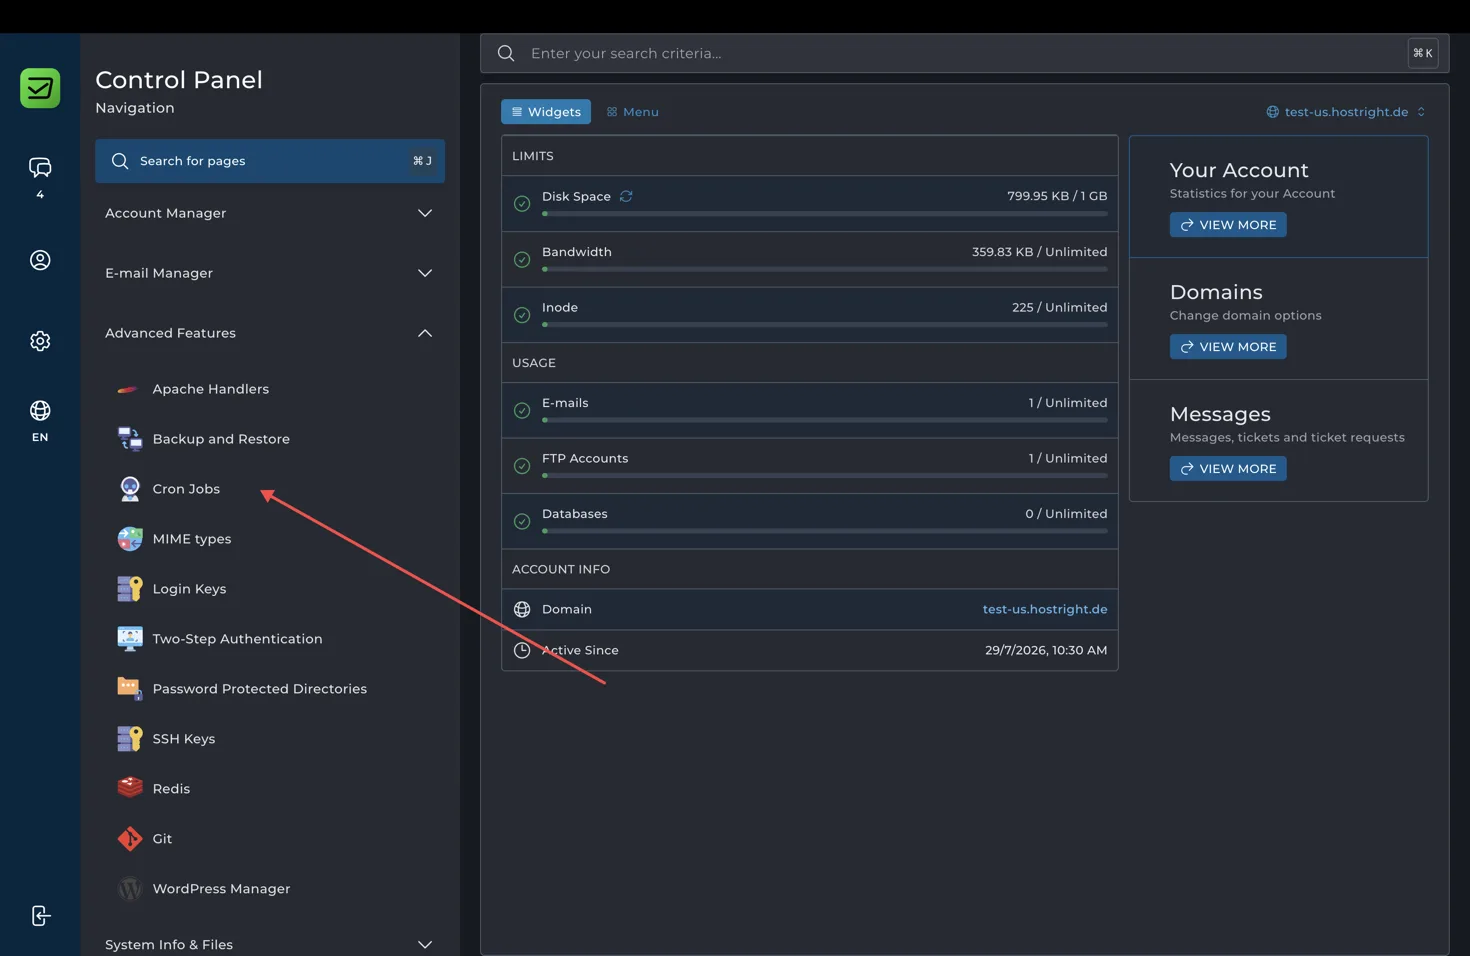
Select the option to create a new cron job.
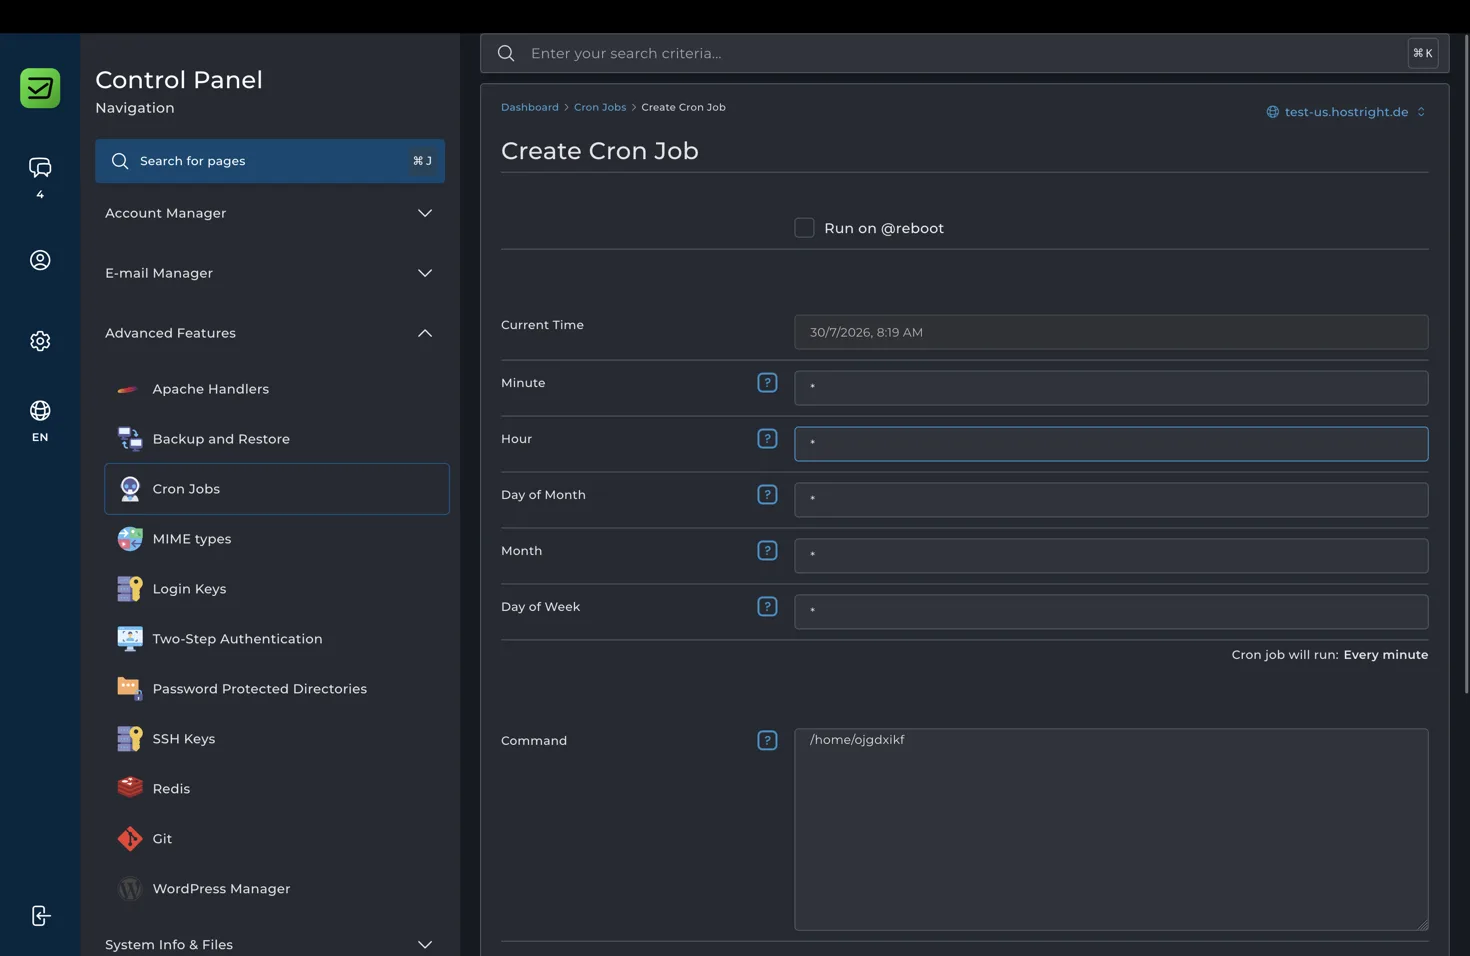
Choose the schedule fields for the frequency you need, then enter the command or script path. For example, a script could archive a website directory, export a database, and send the archive to a separate storage location.
Before enabling a custom backup job, make sure that:
- The script uses absolute paths where possible.
- The destination has enough storage space.
- Database credentials are not exposed in a publicly accessible file.
- The job does not write backup archives into a public website directory.
- Old archives are removed according to a retention policy.
- You have tested both the script and the restore process.
Cron jobs provide maximum flexibility, but HostRight does not automatically manage the contents or correctness of a script that you create. A failed script can create an incomplete backup, so check its output regularly.
Manual backups with Backup and Restore
You can also create a backup manually from the Control Panel. This is useful before changing application files, upgrading an application, changing database settings, or making another significant change.
Open Backup and Restore
In the Control Panel, expand Advanced Features and select Backup and Restore.
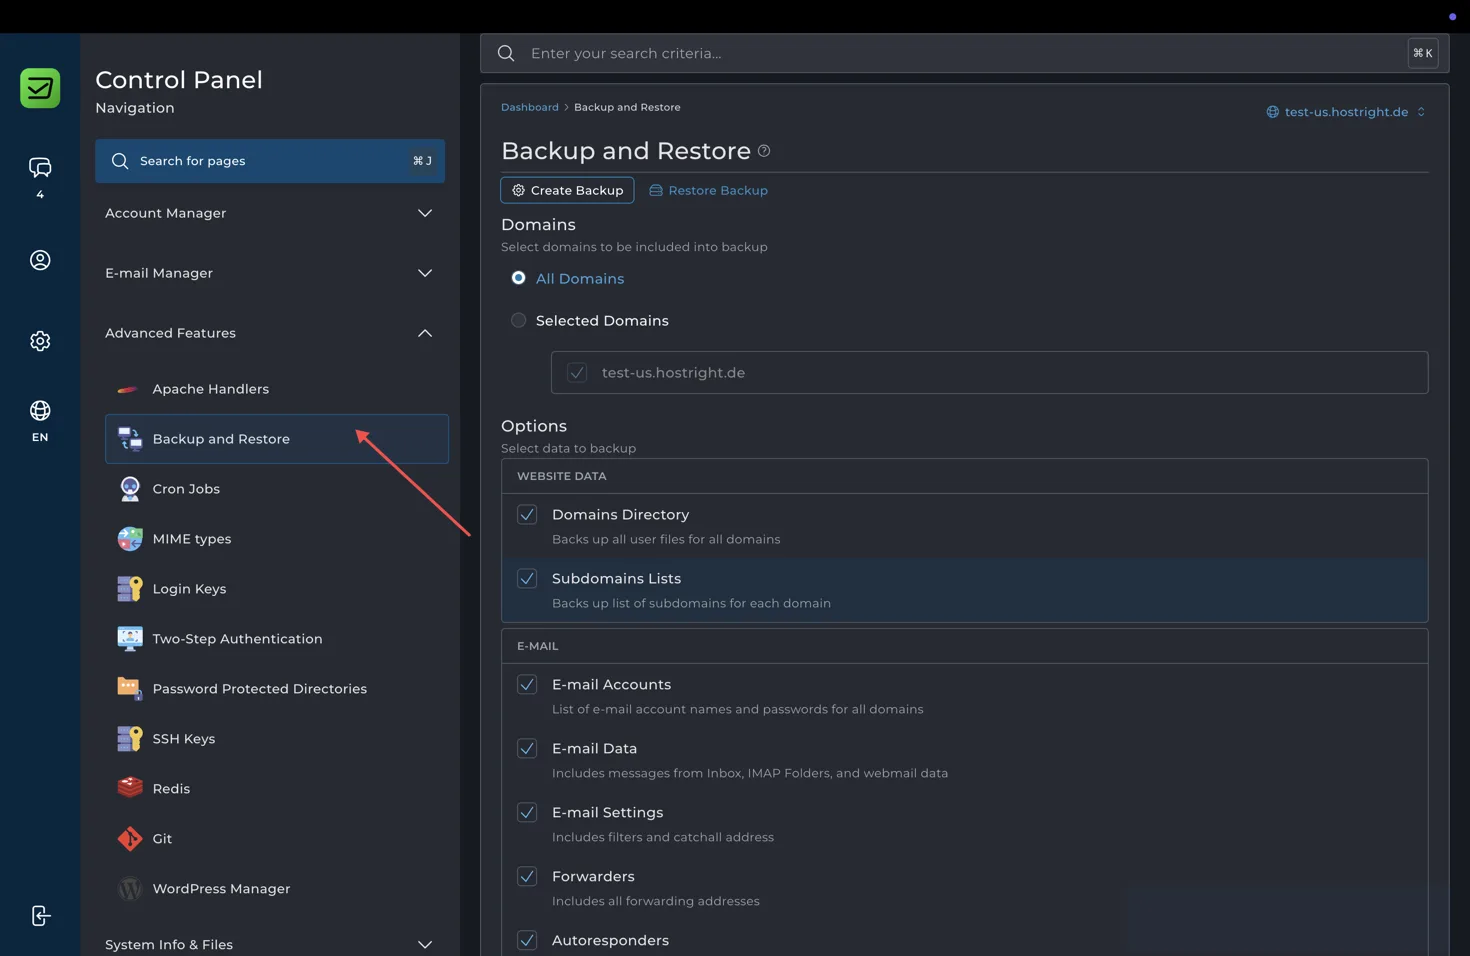
Select Create Backup. The manual backup screen lets you choose the parts of your account that should be included.
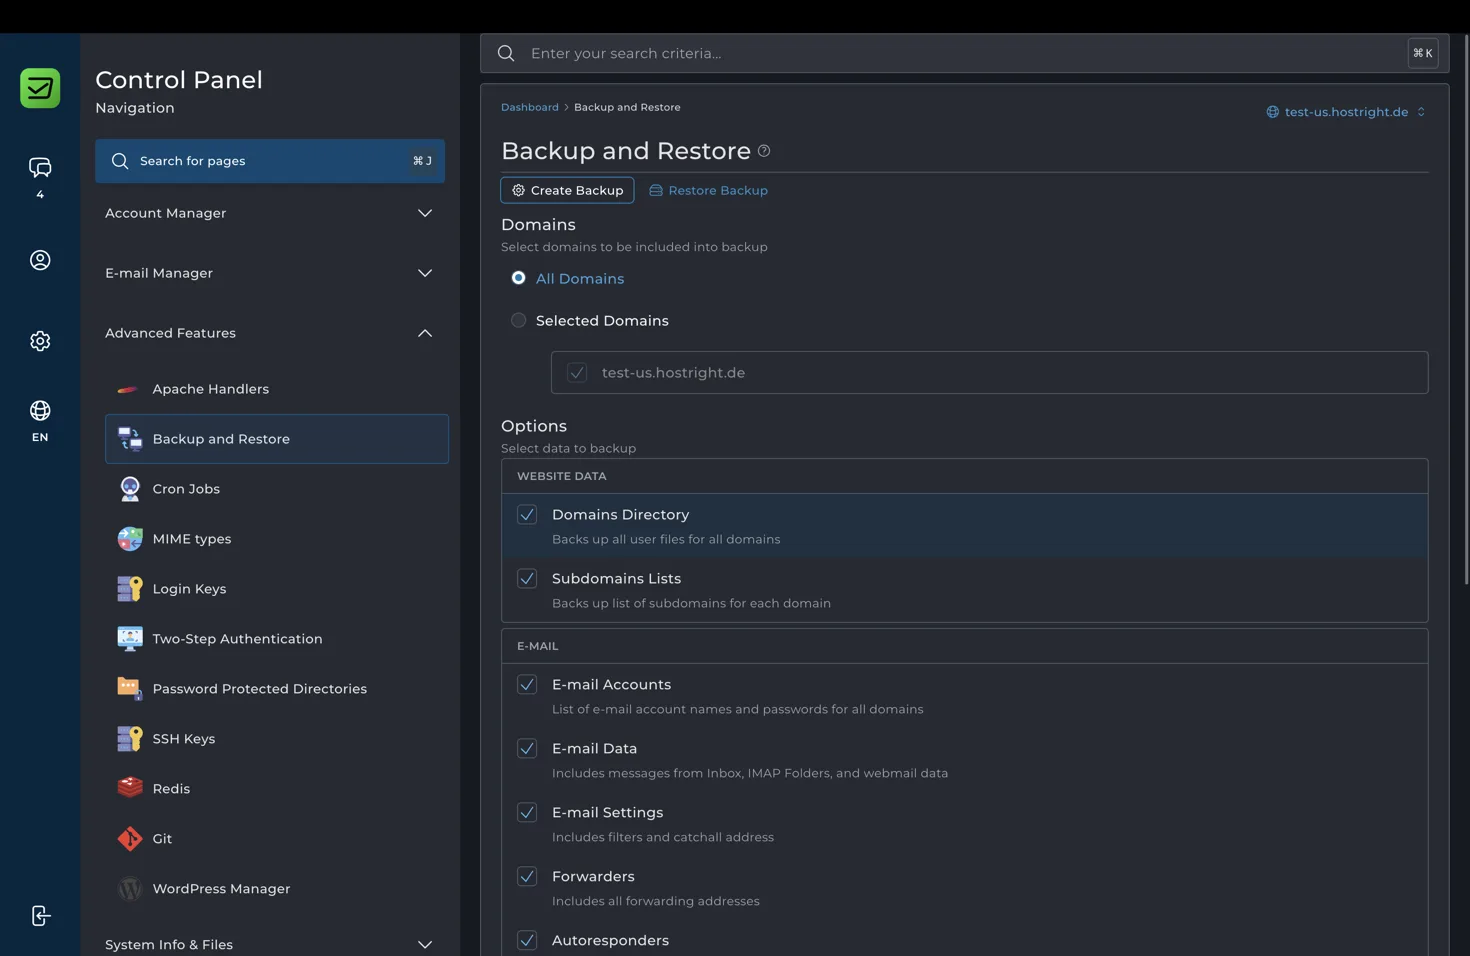
Select the domains and account data you need. Depending on the control panel options, you can include website directories, subdomain lists, email accounts, email data, FTP settings, database settings, database data, and other account resources.
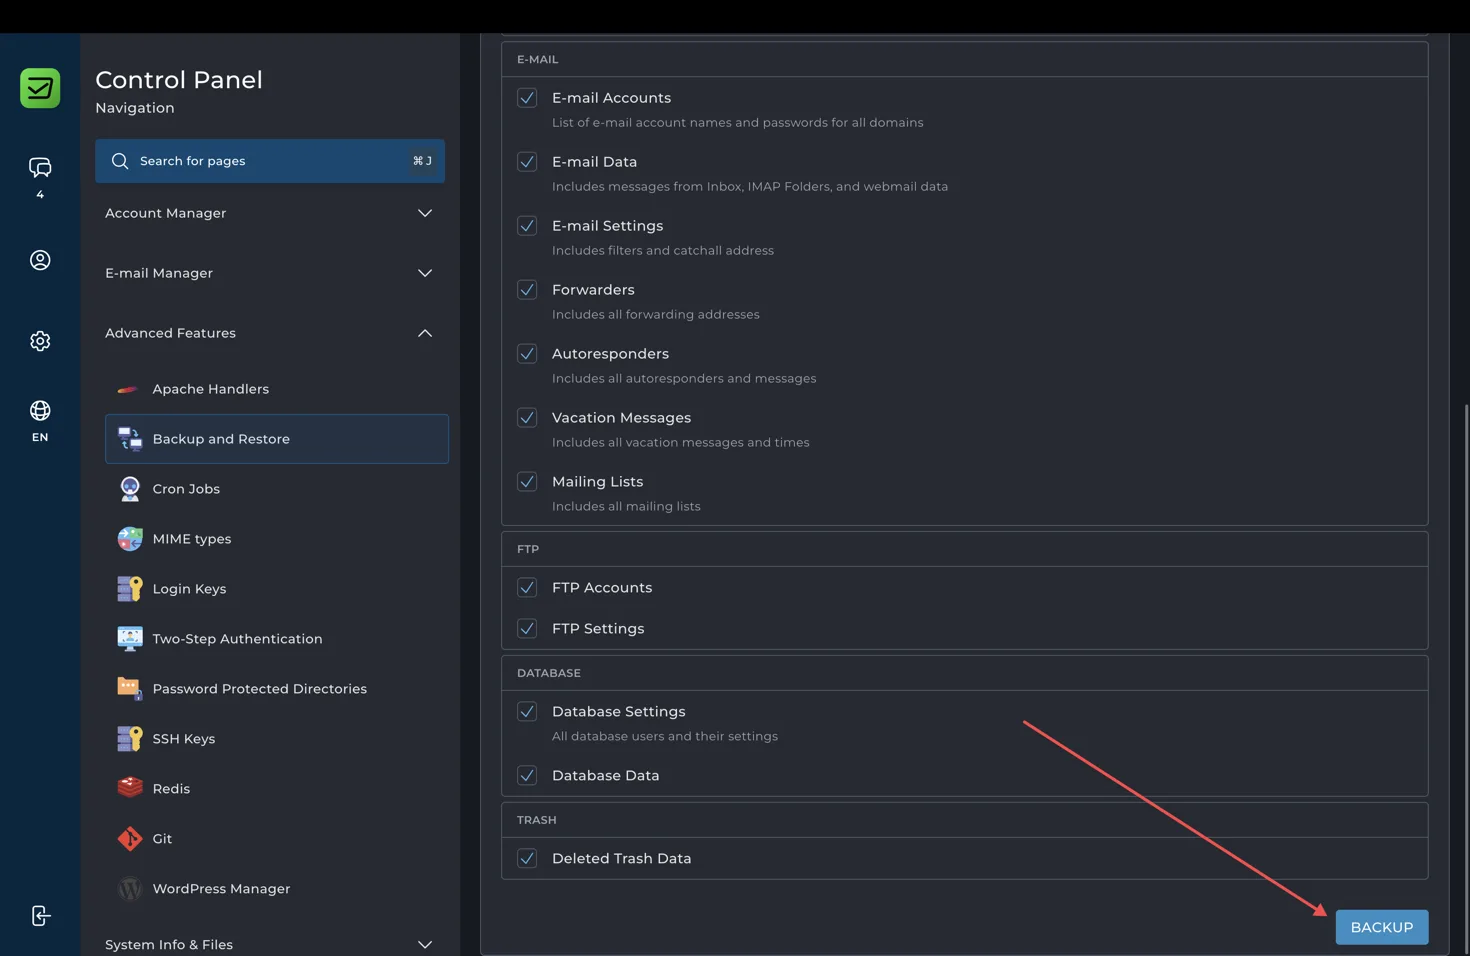
Review the selected options and start the backup. Large accounts may take some time to finish. Keep the Control Panel open until the backup request has been accepted, then check the backup list for its status.
Restore from a manual backup
Open the Restore Backup tab in Backup and Restore. Select the backup archive that you want to use.
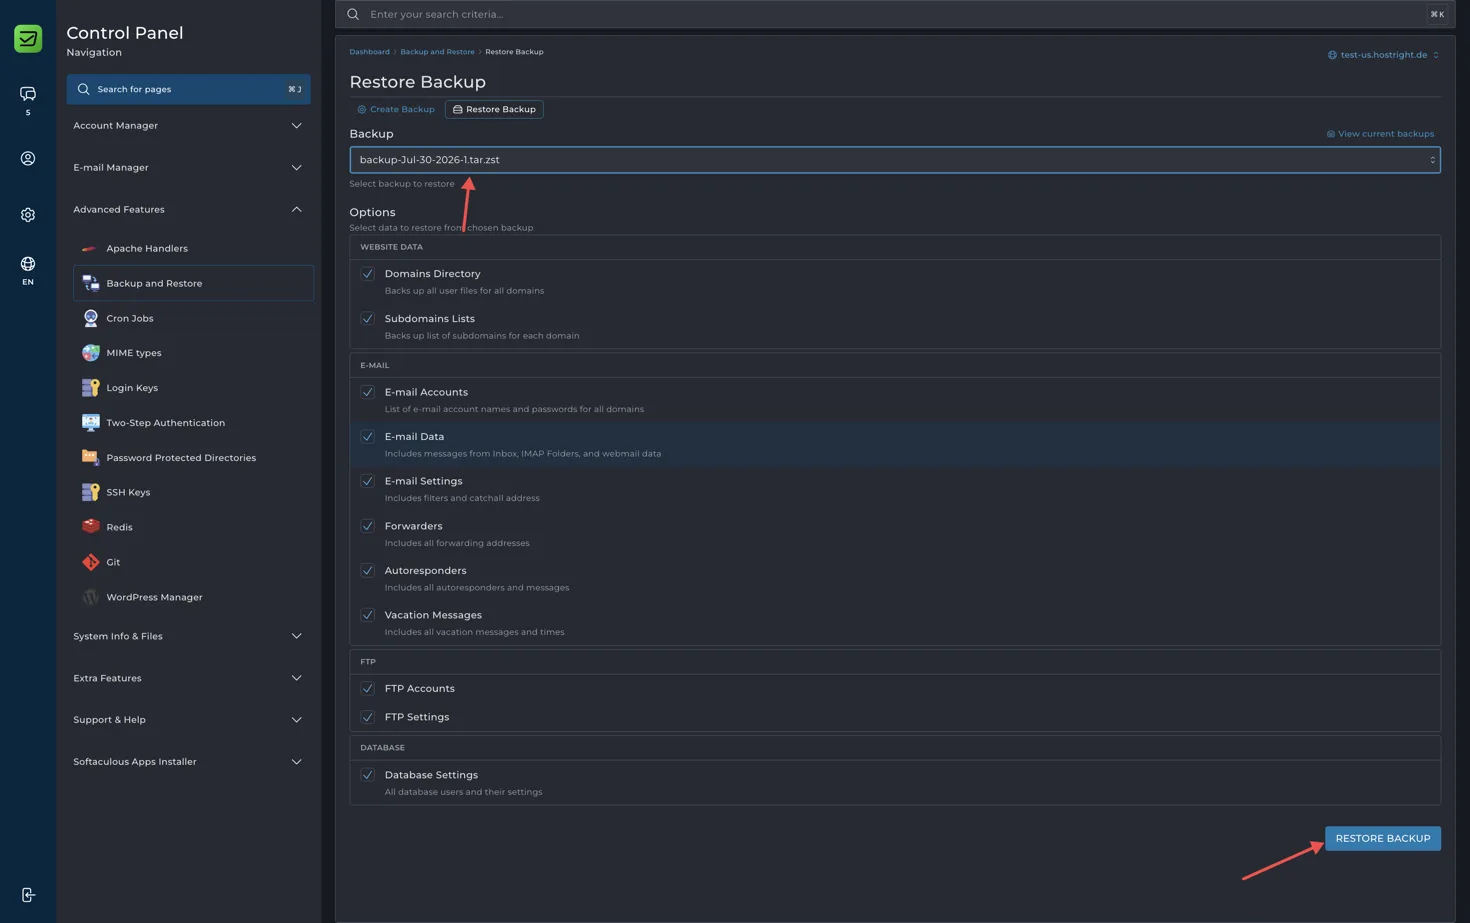
Review the restore options carefully before continuing. A restore can replace current files, databases, email data, or account settings depending on what you select. If you only need to recover one file or database, restore only the required data when the available options allow it.
For a full restore, select the backup archive and the required account data, then start the restore. Do not make additional changes to the website while the restore is running. After it completes, check the website, database connections, email accounts, and any scheduled tasks that were included in the restore.
Which backup option should you use?
Use JetBackup for the regular backups included with your plan. Use a cron job when you need a custom schedule, script, destination, or retention policy. Use Backup and Restore when you want to create a one-time backup before a change or restore data from a backup archive.
For the best recovery plan, keep the automatic backups enabled, test a restore before you need one, and keep a separate copy of the most important data when appropriate.